iOS iCloud Setup
iOS 5.0.1 - iPhone 4S AT&T - 1/4/2011
Setting up iCloud on your iPhone or iPad is easy and quick to do.
What is iCloud? iCloud is a free and paid service offered by Apple for owners of iOS devices and Macs that backs up and syncs certain information on and between devices. It offers a free email along with many benefits and those benefits will grow with time. It is the best way to experience and enhance your iOS and Mac experience.
Start by going in Settings by touching the Settings icon on your iOS device.
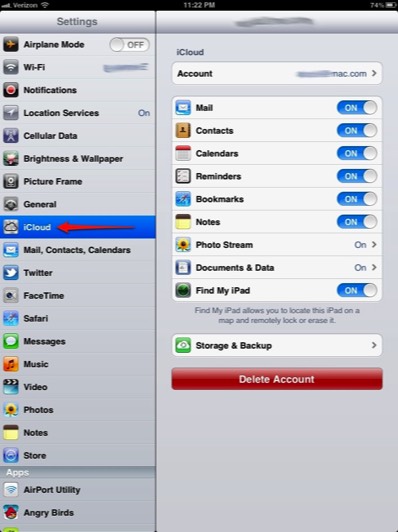
Next choose iCloud. Account is your Apple ID or (iCloud email as some call it). Touch the Account button and sign in to your your account or use this time to sign up for your free iCloud account. You must have a Mac or iOS device (iPhone, iPod Touch, or iPad) to sign up for an iCloud account.
Once logged in you will can pick and choose what you want to have iCloud involved in or stay away from.
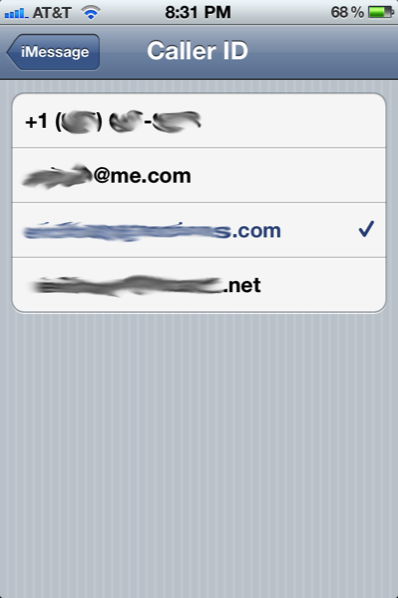
Mail can only be enabled if you chose an iCloud email (@me.com or @mac.com email address). If you had a GMail account, for example, and that is your Apple ID you will not be able to enable the Mail option. The Mail option when enabled will add a new mailbox inside Mail on your device. You can send and receive email to and from this address. The email stays synced, both inbox and sent folders, so it is a step above normal iMap.
Contacts keeps your Address Book in sync across all your devices. This is very handy for those of us who have multiplied devices and Macs. Of course, being iCloud, you have your Contacts backed up in the Cloud.
Calendars, Reminders and Notes work the same way as Contacts. You have your back up in the Cloud and synchronization across all devices and Macs you may have.
Bookmarks also does the same. If you have a Mac, your same bookmarks in Safari (note this only works for the Safari browser) will be the same on your phone. Very cool and I thought it was important enough to bring attention too.
Photo Stream is also a neat feature when enabled. Snap a photograph on your phone and it automatically appears on your iPad, iPod Touch and iPhoto on your Mac. You can't delete photo's form your Photo Stream. This is because it is a back up and as such you can't delete them. If you have some embarrassing photo's of yourself in and want to get rid of it on your Photo Stream, you must log into your iCloud account online and disable Photo Stream there first. Then disable Photo Stream on every device you have it enabled on. Turn Photo Stream back on inside your iCloud account and then enable Photo Stream on all your responses.
Documents & Data is a bit of an unknown but App's like Pages, Numbers, and Keynote make use of this option. If you create a spreadsheet on your iPad in Numbers and want it to automatically appear on your phone next time you pick it up, this option is for you.
Find my *Device* allows your iOS device to send it's location in case you loose your device. I highly recommend this unless you sleep with a tinfoil hat on at night.
Touch the Storage and Back Up option and let's explore this rabbit hole further.
Once logged in you will can pick and choose what you want to have iCloud involved in or stay away from.
Mail can only be enabled if you chose an iCloud email (@me.com or @mac.com email address). If you had a GMail account, for example, and that is your Apple ID you will not be able to enable the Mail option. The Mail option when enabled will add a new mailbox inside Mail on your device. You can send and receive email to and from this address. The email stays synced, both inbox and sent folders, so it is a step above normal iMap.
Contacts keeps your Address Book in sync across all your devices. This is very handy for those of us who have multiplied devices and Macs. Of course, being iCloud, you have your Contacts backed up in the Cloud.
Calendars, Reminders and Notes work the same way as Contacts. You have your back up in the Cloud and synchronization across all devices and Macs you may have.
Bookmarks also does the same. If you have a Mac, your same bookmarks in Safari (note this only works for the Safari browser) will be the same on your phone. Very cool and I thought it was important enough to bring attention too.
Photo Stream is also a neat feature when enabled. Snap a photograph on your phone and it automatically appears on your iPad, iPod Touch and iPhoto on your Mac. You can't delete photo's form your Photo Stream. This is because it is a back up and as such you can't delete them. If you have some embarrassing photo's of yourself in and want to get rid of it on your Photo Stream, you must log into your iCloud account online and disable Photo Stream there first. Then disable Photo Stream on every device you have it enabled on. Turn Photo Stream back on inside your iCloud account and then enable Photo Stream on all your responses.
Documents & Data is a bit of an unknown but App's like Pages, Numbers, and Keynote make use of this option. If you create a spreadsheet on your iPad in Numbers and want it to automatically appear on your phone next time you pick it up, this option is for you.
Find my *Device* allows your iOS device to send it's location in case you loose your device. I highly recommend this unless you sleep with a tinfoil hat on at night.
Touch the Storage and Back Up option and let's explore this rabbit hole further.
Storage & Back Up shows how much of your storage limit you have utilized. The default limit for a free account is 5 GB. Total Storage shows you how much storage you have been allocated. Available storage shows you how much storage you have free to use. Manage Storage allows you to view your storage requirements for each iOS device in more depth. More about Manage Storage in the next section.
When iCloud Back Up is enabled each iOS device is completely backed up to the Cloud. No longer is it backed up to your computer on your local network. This option is for those who have access to a broadband internet connection such as cable or DSL provided internet. If you are on dial up and don't have access to a fast internet connection, this option is probably not for you. Don't give up hope if you are on dialup and keep reading. You can manage what iCloud backs up to the cloud and we show you how later down the page.
If you choose to turn off iCloud than your iOS device will sync over WiFi on your local network. From time to time I will turn off iCloud and perform the Back Up over WiFi just for kicks. After all, when you need to restore from a back up , you may not want to perform this action over the internet due to time. You may want to just snag an iOS device USB cable and do it locally.
After the first initial back up of your iOS device, all back ups of that device going forward will be incremental. This means that only data that has changed will be backed up saving time and bandwidth.
You can also force your device to perform a Back Up immediately. Several conditions must be met. Your battery life must be over 50% and you must be connected to WiFi.
I have upgraded to 55 GB since I have multiple devices and am utilizing the iCloud back up for my entire device. Check this area frequently if you have multiple devices and/or are a big data user to make sure you don't need more space.
Go ahead and touch Manage Storage.

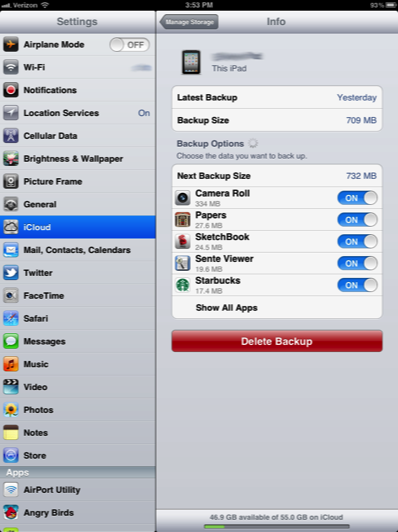
Choosing Manage Storage allows you to view your iOS device individual storage needs. You can see that I have an iPhone and two iPads backing up to this account. You can touch each of your devices in the list and delete those back ups when you discard or loose those devices, and manage what gets backed up to the cloud.
When you choose the iOS device to manage that you are currently operating on, you can selection what you want to have backed up. This may help alleviate bandwidth concerns when performing an initial back up. For instance, if you are on a slow internet connection backing up your Camera Roll may take five or six nights alone. For this, you could turn that off and come back to it once the rest of your data is backed up. Originally, my Camera Roll on my iPhone was over 9 GB in size so I turned it off so I could get a back up without photo's and video completed. I then turned it back on and let it back up over the next several nights. AT&T DSL is not the fastest in the world.
Explore this section but generally I advise people to just leave all options switched to On if they have the storage space available.
Explore this section but generally I advise people to just leave all options switched to On if they have the storage space available.
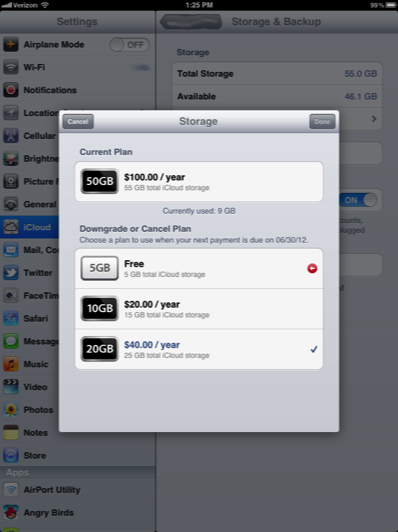
You can increase your Storage and Backup plan if you need more space and are willing to spend the money.