Fuel Filter Replacement
| Tools you will need: |
| Floor Jack |
| Jack stands |
| 16 mm socket |
| 20 mm socket |
| 5/16 wrench |
| Fuel Filter of your choice*** |
| Old Shop Rags |
| Pan |
Car: 1998 LS1 T/A
Installers: Larry Cato
Email: pain@xs-fx.com
People who helped us from major tech talk to general advice:
Jon Ryan (Pro Stock John) Matt Guimond ( CrkHedMat)Larry Cato (PaiN) ZPilot Elmer Boggs (eboggs_jkvl)
Perform all these installs at your own risk. Know how to use all of your shop equipment and take necessary safety precautions when performing ANY modifications and or maintenance items to your vehicle. Seek the advice of a paid professional and do not substitute this publication for the advice of a paid professional. This product is how we accomplished our installs and is not meant to be carved in stone. We are not responsible for a mistake, misprint, or any other error found in this guide. This guide is intended as a supplement and not to be your only source of information.
Purpose: Changing the fuel filter is a crucial part of regular maintenance that must be performed to keep your car running well. Recently, our bud's on LS1.com have noticed how trashed the fuel filter is , even after 10,000 miles run with quality 93 octane gas. So its worth the minimal effort it takes to perform this task.
Preface: Before you start into this install be sure you know how to use all of your shop equipment. Take your time and be careful. Make sure you have an appropriate replacement filter (see Figure 1 below for an example of the fuel filter for a 98 Trans am).
Figure 1

1. First make sure your car is on level ground, apply the emergency brake, and block the front tires! Make sure you have adequate ventilation since you will be spilling some gas!
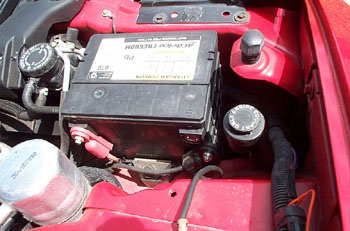
2. Pop the hood, and remove the negative battery cable using the 5/16 wrench (see Figure 2 below).
New, Wireless Brake Light Bright 12-LED Red Brake Light auto- matically flashes when you brake.PP personalpitcher.com/store/
#1 Camaro Cold Air Intake +16 RWHP, +2-4 MPG, +15 LBS TQ Free Shipping! - Made in USA www.coldairinductions.com
O'Reilly Auto Parts Official Auto Parts Site. Shop Our Selection Online Now. www.OReillyAuto.com
Figure 2
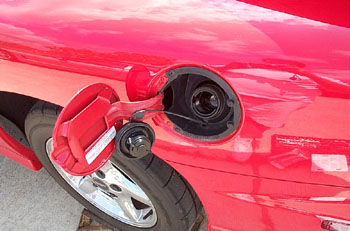
3. Open the gas cap to release any built up fuel pressure (see Figure 3 below).
Figure 3
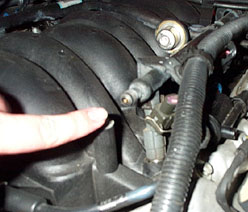
4. Opening the gas cap will not completely release all the pressure in the fuel system. This may be accomplished by accessing the Schrader valve on the front of the driver's side fuel rail (see Figures 4, 5, and 6 below). If you do this, much less fuel will be spilled when changing the filter. (NOTE: we did not undertake this step while changing our filter...it was brought to our attention by another ls1.com member "Zpilot"). The cap on the Schrader valve should twist off by hand like a cap on a tire valve stem. Take care if you attempt to bleed the fuel system from here. I.E. make sure you have the proper equipment, the proper know how, and the engine is not hot!
Figure 4
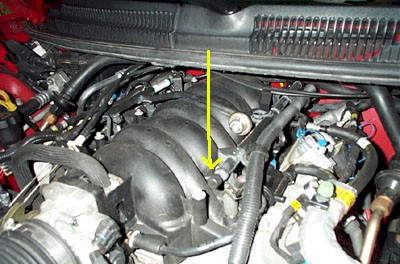
Figure 5
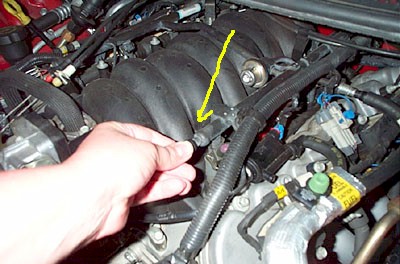
Figure 6
5. Now lift up the rear end of your car. We used a floor jack to lift the rear of the car. Lifting from the rear differential the car was elevated high enough that ramps could be place underneath the rear tires (see photo above). The car was then lowered to where the rear tires were safely on the ramps, but the jack was left with a small amount of force on the differential, as an added safety measure. Note: PLEASE MAKE SURE YOU ARE COMFORTABLE WITH LIFTING YOUR CAR BEFORE ATTEMPTING THIS. READ THE OWNERS MANUAL FOR PROPER LIFTING POINTS.
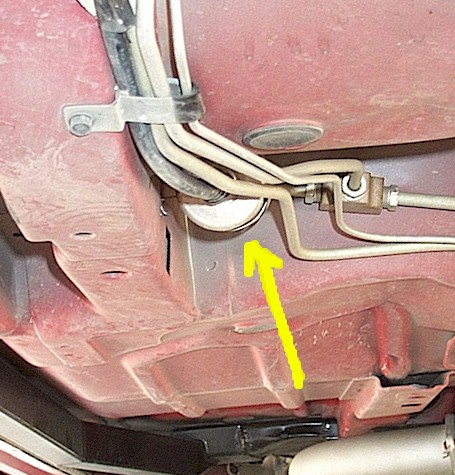
6. Now locate the fuel filter. Its just inside the left rear frame rail, just in front of the left tire (see Figure 7 below).
Figure 7
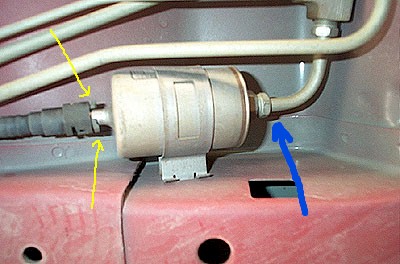
7. Now you are ready to remove the fuel lines from the filter. First remove the quick connect fuel line from the filter. To do this squeeze the two tabs with your right hand (see yellow arrows in Figure 8 below), and pull the rubber hose off with your left hand. The fuel line should come off easily, and expect some fuel to drain from the hose for a few seconds. If its excessive use the pan to catch the fuel. Now remove the Metal fuel line from the filter. Place a 20mm wrench on the hex nut end of the filter, and a 16 mm wrench on the fuel line fastener. Loosen the fuel line fastening nut until its out of the filter and slide it back along the fuel line. Expect some more fuel to drain from the filter, and lines. Now slide the fuel filter out of its holding bracket, and discard (In our case it was easier to slide the filter toward the rear of the car...away from the metal fuel line). If you did not use a pan...this would be a good time to take a break, and let the gasoline on the floor dry. The fumes can get pretty thick under your car when your working in a puddle of fuel.
Figure 8
8. To install the new filter just reverse the directions in step 6. Slide the new filter into the filter bracket (works best if you come from the rear). Slide the metal fuel line fastening nut back down the fuel line, and carefully thread it into the filter. Use the 20mm & 16mm wrenches to hand tighten. Slide the rubber fuel hose back onto the filter...and line up the quick connect snaps. When lined up advance the rubber fuel line until the quick connect snap lock into the fuel line.
9. Close the gas cap.
10. Use the 5/16 wrench to reconnect the negative battery cable to the battery (make sure your hands are free of gasoline!).
11. Turn your key to the "ON" position, and listen for the fuel pump to run. Check underneath your car for leaks. (If you do have a leak recheck your fuel lines...most likely the metal fastener will need to be tighten more. Don't forget to turn off the key, and disconnect the negative battery cable before checking your fuel lines again).
12. If you have no fuel leaks, you can lower the rear of your car, and you are done!
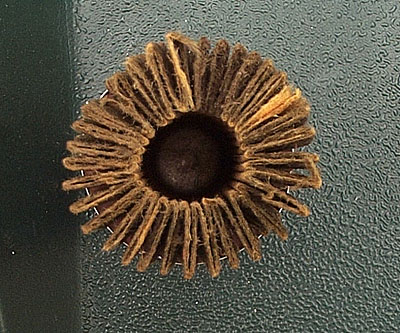
Here is a couple photo's of the filter removed from the car. (Note there were large chunks of black crap that fell free from the filter element while attempting to remove it from the filter case...at the time the two photos below (Figures 9 & 10) were taken when the filter had completely dried).
Figure 9
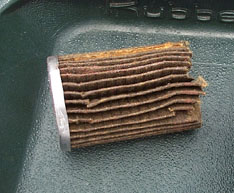
Figure 10