Rear Sway Bar Installation
| Tools and parts you will need: |
| Floor Jack |
| Jack stands |
| 13 mm socket |
| 13 mm wrench (with box end) |
| 14 mm socket |
| 14 mm wrench (with box end) |
| Ratchet |
| Torque wrench |
Parts and Part Numbers Used
Prothane 1LE (21 mm) Rear Sway Bar Bushing & End Link Set 7-1130 Thunder RacingGM Rear 1LE 21 mm Sway Bar 10021221 - Sexton Chevrolet
Car: 1999 Z28 Camaro, 9,000 miles
Installers: Eric and Kelly Barger
Email: help@installuniversity.com
People who helped us from major tech talk to general advice:
Erik (EQuandt) Elmer Boggs ( eboggs_jkvl)All my buds at LS1.com
Perform all these installs at your own risk. Know how to use all of your shop equipment and take necessary safety precautions when performing ANY modifications and or maintenance items to your vehicle. Seek the advice of a paid professional and do not substitute this publication for the advice of a paid professional. This product is how we accomplished our installs and is not meant to be carved in stone. We are not responsible for a mistake, misprint, or any other error found in this guide. This guide is intended as a supplement and not to be your only source of information.
Purpose: The sway bar and bushing replacement will decrease the amount of body roll (in the curves) and nose dive (when braking) and increase the overall stiffness of your car. Your tires will maintain a larger contact patch for increased traction for any road condition.
Preface: Before you start into this install be sure you know how to use all of your shop equipment. You might also want to have a friend help you during this install to help make the job a lot easier.
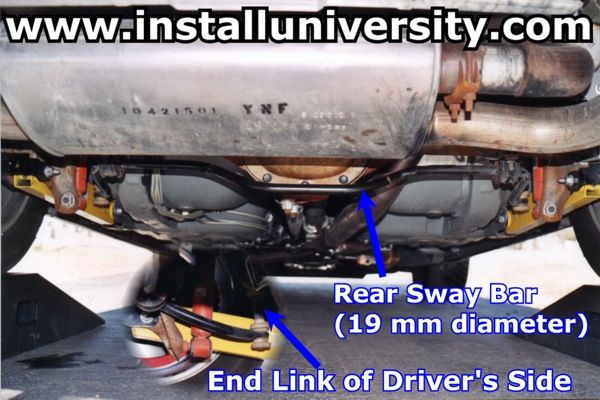
1. We placed the rear of the car on a set of Rhino Ramps at the start of the install. When it became apparent that we could get better pictures of the car with the tires removed, we placed the car on a set of jack stands. Then we chocked the rear wheels and placed a floor jack just touching the car frame because we are anal about safety. Locate the rear sway bar and the end links (see blue arrows in Figure 1).
Figure 1
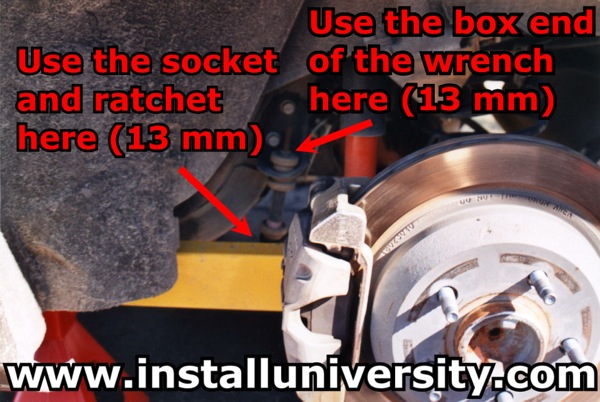
2. Go ahead and grab a 13 mm box wrench and 13 mm socket and ratchet. Place the box wrench on the nut at the top of the end link and use the socket and ratchet to loosen the bolt in the end link from the bottom (see red arrows in Figure 2). Once you do this to one side, repeat the procedure on the other side.
Figure 2
3. Now you are ready to remove the "D" bushings (see green arrows Figure 3). When removing the bolts from the bracket that holds the bushings in place be ready to catch the sway bar before it falls and hits you on the head. Also, pay close attention to how the brackets and U-bolt are placed to hold the "D" bushing.
Figure 3

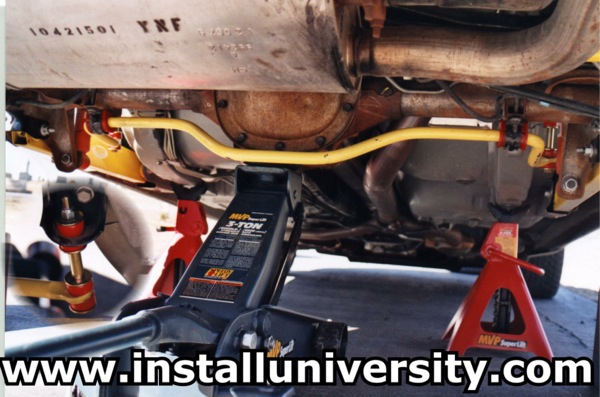
4. Now you should get your new sway bar and bushings ready to install. Take note of where the "D" bushings are on the stock sway bar. Place a little grease (should come with the bushings) inside the "D" bushings. Then slide the bushings onto the sway bar back to the same place where the stock ones are on the factory sway bar with the slits facing the rear. We used the box end side of a wrench to spread the bushings apart to get them on the sway bar. Now you have a bunch of grease on the bar. Use some WD-40 to wipe it off. Otherwise, just wait to put the grease on the inside of the "D" bushing after you get it on. We found it easier to place the grease on before.
Tighten up the brackets enough so they will stay up in the air. Now go ahead and place the end links back together. Our Prothane end links used a 14 mm socket and wrench (the boxed end) to tighten them back up. Get them just tight enough to hold on and do the other side. Now, go ahead and tighten up the nuts on the end links to 16 ft-lb. Now make your final adjustments on your "D" bushing to make sure it is lined up correctly (you will see what we mean when you do the install) and tighten the nuts down to 18 ft-lb.
Notice the bottom left hand corner (see Figure 4); we have a shot of one of the end links up close.
Figure 4
5. That does it! Lower the car and go for a drive.
Comments: We did this modification along with the 1LE front sway bar with bushings and end links. The car felt much stiffer and had a lot less body roll in the turns and less nose dive during braking. We both have commented on the harsher ride we seem to get along with this install. This has been the most noticeable improvement to date on the car. Going on curvy roads has never been so much fun!