BMR Bolt-On Relocation Brackets
| Tools & parts you will need: | Date: |
Perform all these installs at your own risk. Know how to use all of your shop equipment and take necessary safety precautions when performing ANY modifications and or maintenance items to your vehicle. Seek the advice of a paid professional and do not substitute this publication for the advice of a paid professional. This product is how we accomplished our installs and is not meant to be carved in stone. We are not responsible for a mistake, misprint, or any other error found in this guide. This guide is intended as a supplement and not to be your only source of information.
Purpose: This modification will serve several purposes for your car. If you have a car that been lowered (i.e. lowering springs), this modification is a must. When your car is lowered, the body of the car moves closer to the chassis changing the factory geometry of your suspension. Your rear lower control arms (LCA) will be offset from an angle parallel to the ground. This results in less force being placed on your LCAs causing your tires to spin easier. The relocation brackets allow the LCAs be moved back to an approximately a level position.
On a stock ride height car, relocation brackets erve a purpose at the drag strip. When used in conjunction with aftermarket lower control arms and a set of slicks or "cheaters", a 0.2 second reduction in the 1/4 mile has been proven.
Preface: Before you start into this install be sure you know how to use all of your shop equipment. Take your time and be careful.
Notice: This installation has one problem, I took horrible pictures. I had a backlight condition and did not use the flash which resulted in very dark pictures of objects close to the camera. I will be redoing this install in the near future to retake better pictures and to add more pictures that had to be removed because they were so bad (dark). Sorry for any inconvenience.
1. We placed the rear of the car on two jack stands and chocked the front two wheels. We placed a set of rhino ramps under the rear tires and let the floor jack down but left it under the rear differential for added safety.
2. We thought it best to remove the tire to make more room when working during this install. Use a 3/4" socket and the security socket (only if you have the special lug nut that came with the security package). You might also have to remove the center cover depending on your wheels.
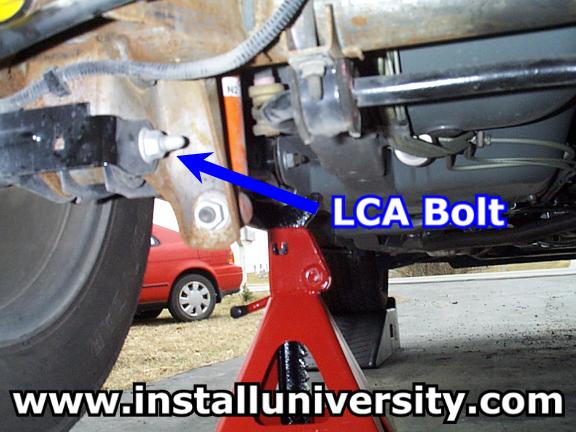
3. Locate the the rear bolt on the LCA. Use an 18 mm socket and wrench to remove this bolt (see Figure 1).
Figure 1
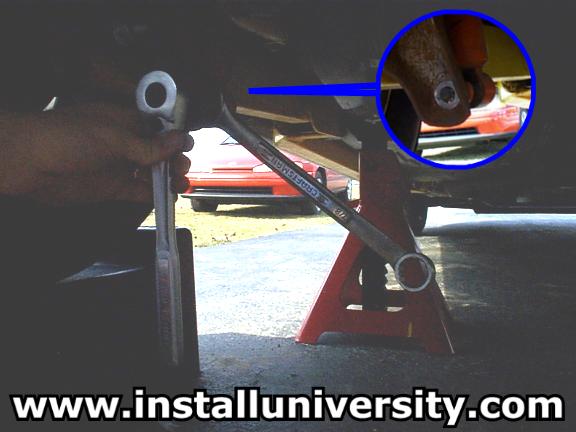
4. Remove the lower shock bolt (see Figure 2). This will require a 7/8" socket (deep well) and a 3/4" wrench. Pay no attention to the fact that the nut is missing on the shock bolt.
Figure 2
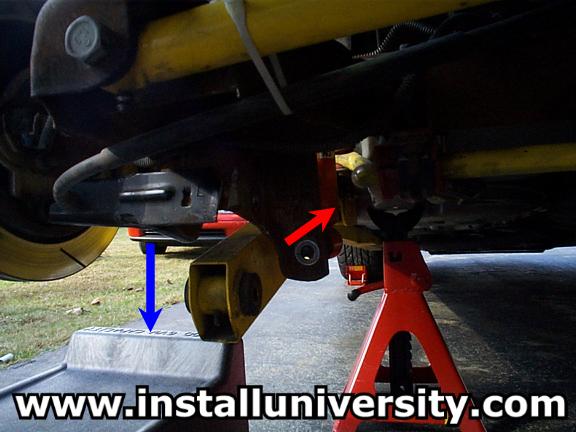
5. You will need to lower the lower control arm out of the mount and push the shock bolt back through the shock frame mount (see Figure 3). Our BMR control arms were not going to come out without some form of persuasion. Removing the tire made room for our rubber mallet that will persuade the lower control arm to drop out of the rear bracket. The shock bolt should easily push back out of the frame mount.
Figure 3
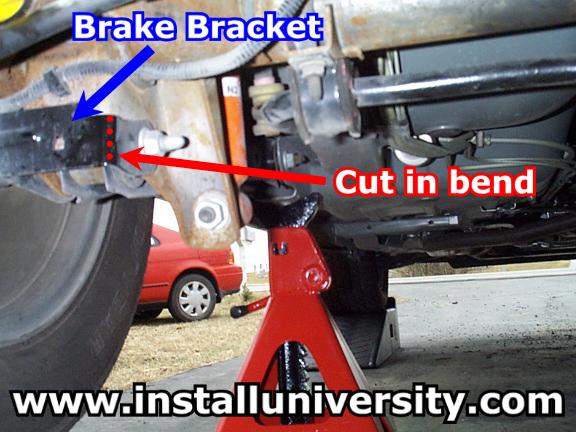
6. The next step was a little tough to swallow. You have to cut or bend the inside leg of the brake line bracket. Locate the driver's side brake bracket and then view the cut bracket in Figure 4. I had some serious reserves about cutting on my car. With that in mind, I tried to bend the leg out of the way. It was no problem to bend but it would not bend back to fit over the existing LCA bolt hole. I then cut the bracket.
Now, I do not hesitate telling anyone to cut their bracket. It is really a minor adjustment and this is a muscle car. A small cut is not going to end my world, and it had to be done. Besides, it makes the job SOOOOO much easier. :-)
Cutting the bracket was a very easy job for us. We used a battery powered DeWalt reciprocating saw. I highly recommend a power tool for this job. It will greatly cut down on the install time. Just be careful not to get drunk on the power and cut into the frame as I did. DOH!
Figure 4
7. Install the bracket over the original LCA bolt holes. Place the "spacer" in-between the LCA mount bracket so the bolt will pass through (from outside to inside) the bracket, LCA frame mount, spacer, and LCA frame mount as shown in Figure 5.
Place the shock mount on the bracket is in front of the lower shock bolt mount on the frame. Slide the the lower shock bolt through the bracket and frame mount.
Insert the original LCA bolt. This might be a little difficult but it can be done. I used a small pry bar and a screwdriver to move the bracket as needed (see Figure 6). It might take a few minutes, but the bolt will go in. Once the bolt is through, hand-tighten the nut on the LCA bolt and lower shock bolt! You will tighten both nuts to specification later.
Figure 5
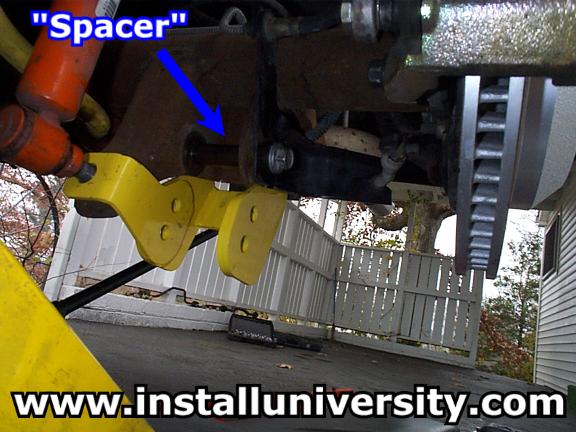
Figure 6
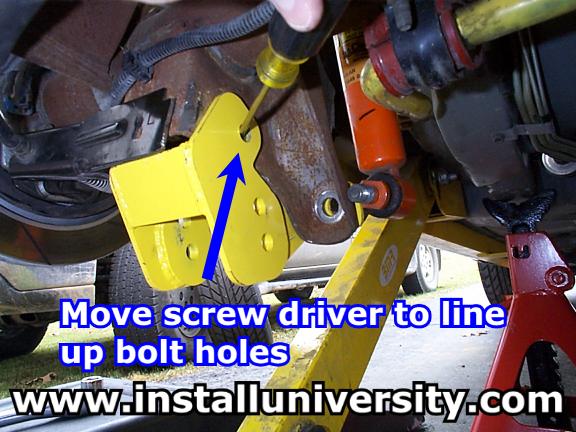
8. Now comes the most difficult part of the install. The LCA must be lined up with the bolt hole of choice on the LCA bracket. This is easier said than done the first go around. You can use your floor jack to lift the rear differential, while using a screwdriver to rotate the axle so the bolt supplied with the kit can be slid through the bracket, LCA, and then the other side of the bracket. Once the bolt is through, hand-tighten the nut! You will tighten it to specification later.
Figure 7
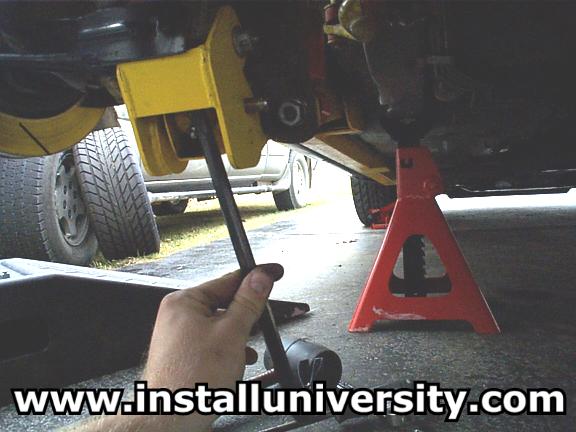
9. Repeat Steps 1 - 8 on opposite side of the car install the other bracket.
10. Tighten both lower shock bolt nuts to 66 ft-lb.
With the LCA brackets in place with bolts back in, LCA nuts finger tightened, and the shock bolts tightened, raise the rear differential housing up off the floor jacks about 1/4” and place the rear suspension in a “loaded” position. The nuts should be tightened while the car is in a loaded position!
Tighten the original LCA bolts to 80 ft-lb. Tighten the lower bolt on the relocation bracket that now holds the LCA in place to 80 ft-lb. Tighten the other side and lower the car. That is all there is to it.
Comments: There is a definite difference in traction on the 1-2 shift on street tires. We completed this install a day after our local drag strip closed for the season. :-( That means I don't have any track data to back up my claim, but there is a difference. When used in conjunction with slicks on a non-lowered car, a 0.2 second difference has been seen in the 1/4 mile. I have interviewed several LS1 owners and all have gained at least 0.1 seconds in the 1/4 mile. I installed the brackets on my 1999 Z. My Z is not lowered; I wanted the better traction.
Looking back on the install, I would guess that this install would be easier if we had unbolted both lower control arms at the same time instead of one side at a time. This is just an observation, and I have not explored that option yet. I will go back and redo this install at a later date and update my horrible pictures (I will use the flash for sure) and unbolt both LCAs and try again to see which is easier.
The second side goes a lot quicker than the first side. The learning curve is basically straight up after doing the first side.
The horrible pictures were a result of me not paying any attention to my camera. The camera was not using the flash because of the back light condition caused by the surrounding light around the car. Pictures will be updated in the future, so stay tuned.