Grab Handle
2002 C240: Front Passenger Door Grab Handle Replacement
When viewing, using, and/or any other method applied to this publication you agree to the following statements. You, your next of kin, heirs or assigns release www.installuniversity.com, all other persons associated in the making, production, and participation of this publication. Rephrased in plain English: When you view this web page you, your next of kin, heirs or assigns agree not to sue any associated persons with the publication for any accident or damage in ANY form (mental or physical to your car and/or yourself) because of this publication, or your failure to heed proper safety, maintenance and/or modification procedures. You also agree that your next of kin, heirs or assigns cannot sue all persons associated in the making, production, participation, and publishing of this publication.
Perform all these installs at your own risk. Know how to use all of your shop equipment, and take necessary safety precautions when performing ANY modifications and or maintenance items to your vehicle. Seek the advice of a paid professional and do not substitute this publication for the advice of a paid professional. This product is how we accomplished our installs and is not meant to be carved in stone. InstallUniversity.com is not responsible for a mistake, misprint, or any other error found in this guide. This page is my experience and only documented as a reminder for myself for future references if I encounter this problem again.
Symptom(s): When you shut the door, the handle breaks. :-)
Date Repaired: 9.152004 Mileage: 85,756
Quote to fix from local MB dealer: $140
Part information, cost, were purchased:
1. Grab handle - A2038100851 + 4 digit trim code number - $30.60 - Mercedes Benz of Knoxville
Time it took to install: 35 minutes
Complexity of Install: Easy - Medium
Tools needed for this install:
1. Torx 25 screw driver
2. Torx 20 screw driver
3. Strong slim pry piece (such as a flat head screw driver)
4. Small pocket screw driver
Install Contributors
1. Steven Lewis (a.k.a. saturnstyl @ MBWorld.org)
2. Jasmel Sidhu
Introduction
I assume you are reading this install if you broke your grab handle from shutting the door in a normal manner. I know, blasphemy, but it is true. That is how ours broke. Many other Mercedes Benz owners have experienced the same break, in the same place. Hopefully, it doesn't happen to you, but if it does, you will not cry when you see the quote from the dealership to replace the handle because you have this install document to guide you through the entire process.
Installation Procedure
1. Take the small pry piece, flat head screwdriver, and carefully pry upward on the SRS Airbag plate from the bottom of the badge (see Figure 1). It will pop out, but will stay connected via a plastic strap as shown in Figure 1. Let the badge hang by the strap.
2. Locate the notch on the bottom side of the grab handle (see Figure 2). Take a flat head screw driver and pry the piece apart being careful not to damage the grab handle. This piece should pop apart as you begin to pry it open.
3. The four torx screws on the outside of the door panel can now be removed (see Figure 3). You will need a T-25 and T-20 screw driver to remove the screws.
Remove the screw in the top and bottom of the grab handle with a Torx 25 screw driver as shown in Figure 5. The top screw will not come out with the handle and it is possible that the lower screw will stay lodged as well. Just be sure both screws have been unscrewed so they are free spinning. The handle will not come loose at this point. There are two brass screws on the inside that will be removed later in this document.
The screws behind the SRS badge and the one in the trim piece will fall out. So be on the watch for them.
4. Pull the plastic trim piece, located on the outside of the door, toward the rear of the car gently. It should work itself right out in a minute. Figure 4 shows the clip on the backside. That will give an idea how to remove the trim piece. It will slide out if you pull the bottom of the piece toward the outside of the door.
5. Remove the small triangular plastic trim piece in the upper corner of the door (see Figure 5). Pull towards the rear of the car on the rear backside of the piece. Once the cover is free, you can let the piece hang, or remove the plastic cover from the speaker and let the speaker hang back through the window out of the way.
6. Remove the door lock lever cover by unscrewing it as shown in Figure 6.
7. Having all the screws and triangular piece removed, locate the bottom corner on the door toward the rear of the car as shown in Figure 7. Take a flat head screw driver and gently pry back the trim enough to get a decent hold on the trim. Pull back gently and the six snaps holding the trip in place will start popping out of place (see Figure 7).
8. Please have your T-20 screw driver and parts close at hand for the next few steps.
9. Lift the entire door panel in an upward motion while using your fingers to start prying the top part of the panel away from the car. It does require some force to separate the panel from the door, but once the panel starts to separate, it gets really easy. Be careful when you get the panel removed because there are several wire connections still holding the panel to the door. I chose not to remove any of the wire connections from the panel. It just took two minutes of holding the panel to complete the next six steps.
10. Remove the grey plastic foam cover over the backside of the grab handle as shown in Figure 8. The piece is very flimsy and will most likely rip. No big deal really, so get on with it. Look for two brass screws in the lower part of the grab handle shown in Figure 8. Remove them using your T20 torx screw driver. Please note that the photograph in Figure 8 was taken from the outside of the door looking in through the window down between the now removed panel and door.
11. Find the black plastic cylinder on the inside panel at the top of the grab handle (see Figure 9). Unscrew the plastic cylinder, counter clockwise, until it pops out. This actually unscrews from the grab handle.
12. Once the black cylinder is removed, remove the grab handle from the door. The handle should remove painlessly at this point.
13. Since I had to purchase a new grab handle to replace the broken one, it came with a brand new black cylinder and screw like the one you just removed from the inside door panel. Place the new grab handle top into the through he slot and through the panel. Screw the black cylinder back into the receiver slot in a clockwise motion while tightening down on the top of the grab handle. I tightened the cylinder until it was snug. There is no use in getting carried away and breaking anything else! ;-)
14. Retighten the two brass screws using your T-20 torx screw driver shown in Figure 10. I do not have a torque specification but "snug" will do. Do not over tighten! Take the grey plastic foam sticky stuff and put it back over the lower grab handle the best you can.
15. Replace the side panel back onto the door. Be sure to not forget to get the lock lever back through the guide hole! I found it convenient to replace the lock lever cover immediately once I had the lock lever through the guide hole. When securing the panel back in place, press down on the top of the panel a little at a time and the door panel will seat itself back into the upper groove.
16. Once the panel is installed in the top groves, push on the lower side panel back into the door so the snaps pop back in.
17. Remove the top layer of the new grab handle, if it already isn't removed, using the same procedure in Step 2.
18. Tighten the bottom screw in the grab handle using your T-25 torx wrench. No torque specifications, but snug will do fine. You will need to tighten the screw in the upper part of the grab handle. This one is a little tricky. At first, I could not get the screw to take hold. I got a little impatient and pushed hard on the screw with the screw driver. I heard a pop and the screw driver moved in quite a distance pushing the screw further into the door. At this point I thought I had screwed up, but instead I did exactly what I was suppose to do. The screw popped into place and caught on the metal receiver bolted on the door. Yeah! Just tighten these screws to "snug" (see Figure 11).
19. Tighten the screw behind the SRS Airbag cover using a T-25 torx screw driver. You know the drill, just tighten to "snug". Pop the cover back into place (see Figure 11).
20. Reapply the plastic trim piece being sure to get the rear tab underneath the metal tab on the door. Install the screw using your T-20 screwdriver to "snug" (see Figure 11).
21. Replace the grab handle top cover by popping it back into place.
22. Replace the triangular speaker cover and speaker by snapping it back into position.
23. Smile! Your done!! Doesn't Figure 13 look nice?
Click on the photographs to enlarge them.
Figure 1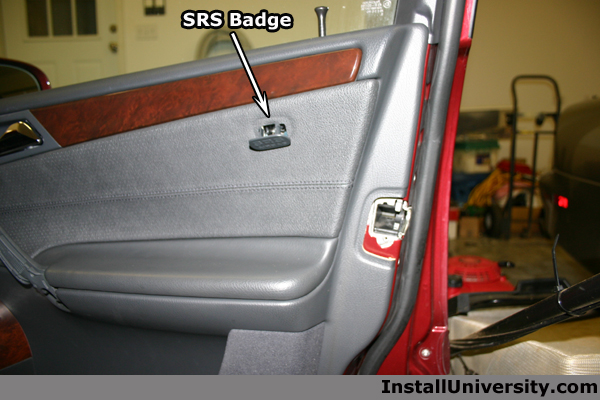
Figure 2
Figure 3
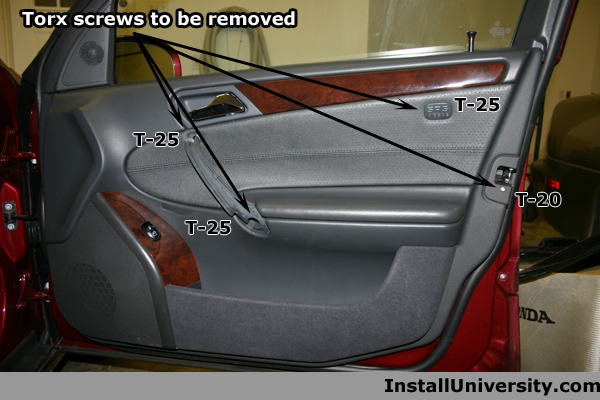
Figure 4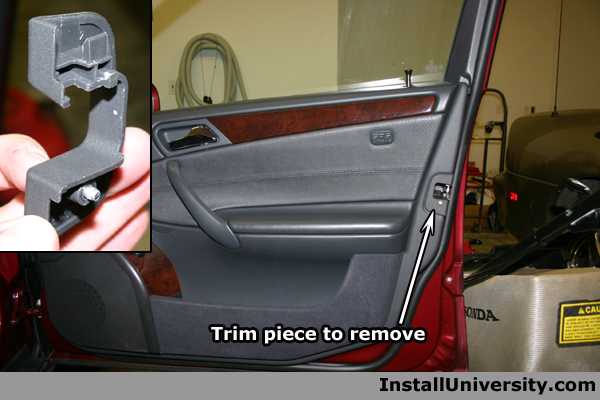
Figure 5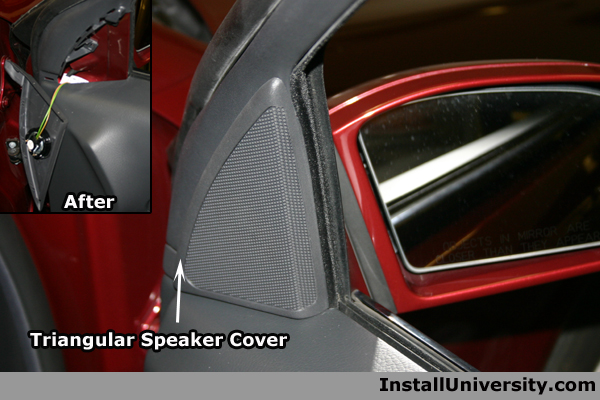
Figure 6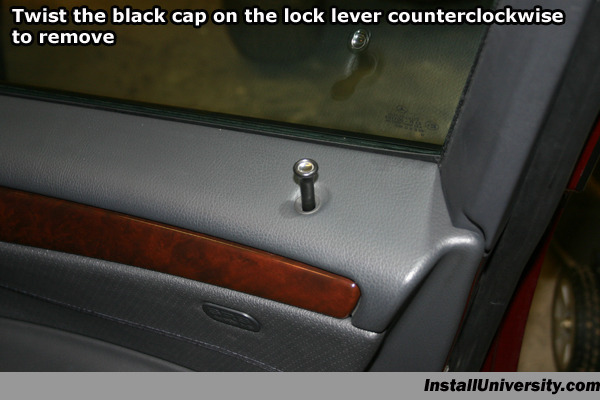
Figure 7
Figure 8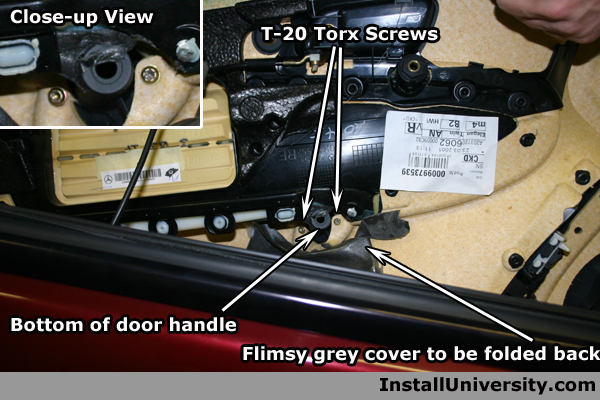
Figure 9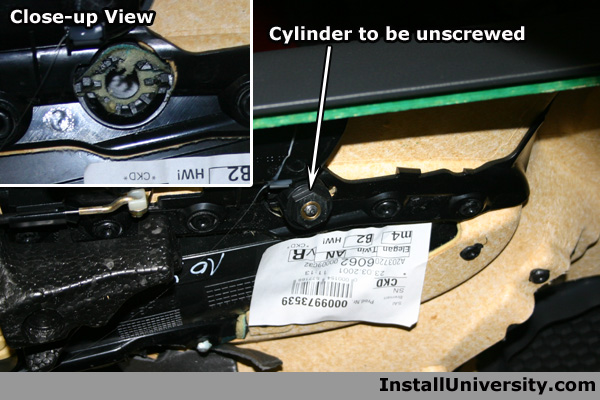
Figure 10
Figure 11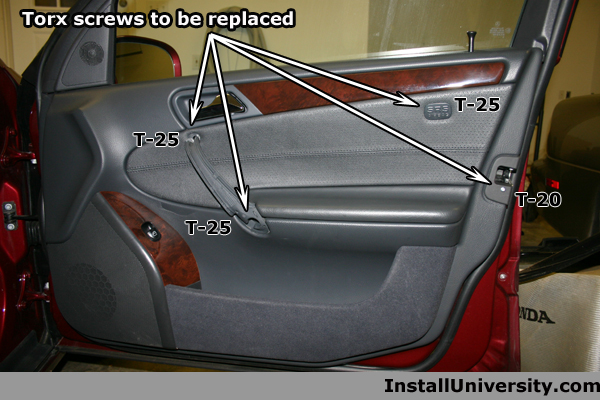
Figure 12
Figure 13