AMG Brake Swap
2003 C320: AMG Brake Conversion
When viewing, using, and/or any other method applied to this publication you agree to the following statements. You, your next of kin, heirs or assigns release www.installuniversity.com, all other persons associated in the making, production, and participation of this publication. Rephrased in plain English: When you view this web page you, your next of kin, heirs or assigns agree not to sue any associated persons with the publication for any accident or damage in ANY form (mental or physical to your car and/or yourself) because of this publication, or your failure to heed proper safety, maintenance and/or modification procedures. You also agree that your next of kin, heirs or assigns cannot sue all persons associated in the making, production, participation, and publishing of this publication.
Perform all these installs at your own risk. Know how to use all of your shop equipment, and take necessary safety precautions when performing ANY modifications and or maintenance items to your vehicle. Seek the advice of a paid professional and do not substitute this publication for the advice of a paid professional. This product is how we accomplished our installs and is not meant to be carved in stone. InstallUniversity.com is not responsible for a mistake, misprint, or any other error found in this guide. This guide is intended as a supplement and not to be your only source of information.
Person performing installation: Sunil Patel "sunman" at MBWorld.org
Symptom(s): You look down at your brake calipers and want a nicer looking setup.
Date Repaired: November 2004 Mileage: 25,500
Quote to fix from local MB dealer: $400 Labor only
Part information, cost, were purchased:
1. Brake pads, rotors, and calipers - ~$700 dollars - EVOSPORT
2. Genuine Mercedes Benz DOT 4 Brake Fluid - Local MB Dealer
3. MB Long Life Grease if required on rear of disc Part No. 000-989-63-51
Time it took to install: 2.5 hours
Complexity of Install: Medium
Tools needed for this install:
1. Bucket
2. Vacuum system
3. Rags
4. Ratchet
5. 17 mm socket
6. 14 mm wrench
7. 3" socket extension
8. Inverse Torx E7 Socket
9. Pry bar
10. Torx t30 screwdriver
11. 11mm wrench
Install Contributors
1.
Introduction:
Perform this modification to one wheel at a time. That way, if you run into a problem, you have an example to go by on the other side.
Installation Procedure
1. Support the car appropriately before proceeding. Break loose the the wheel bolts on each wheel using a 17 mm socket/ratchet combination (see Figure 1). Jack the car up and support the car on jack stands (see Figure 2). Finish unscrewing the bolts and remove wheels. When removing the wheel, be careful not to rub (scratch) the inside of the wheels against the brake calipers.
2. The passenger side wheel has the sensor for the brake pad wear indicator. The sensor is held in place with an inverse torx bolt E7 shown in Figure 3. Unscrew the bolt and the connector assembly will come right off.
3. The caliper is held in place with two bolts shown in Figure 4. The left side does not have this sensor. The two bolts for the caliper are located behind the caliper. One on top and one on the bottom. They are the bolts with the ribbed rubber. Once the two bolts are loosened using a 17 mm socket, the caliper will feel loose but will be hard to remove still. Use the pry bar and pop the caliper off. It's not too tight, but since the piston is compressed, it makes it hard to remove. Figure 5 shows the brake caliper removed.
4. Remove the old brake pads shown in Figure 6.
5. Two brake caliper subframe bolts need to be removed using a 17 mm socket shown in Figure 7. You should have a dangling caliper while the rotor is still mounted. Support the caliper by using a small bungee chord or rope so you don't stress the brake lines.
6. There is one torx T-30 bolt holding the brake rotor in place shown in Figure 8. Remove the bolt and the brake rotor will come right off.
7. Get a small bucket to catch some of the brake fluid. Using a 14mm wrench, unscrew the brake hose as shown in Figure 9. The hose will not turn so you will have to keep turning the caliper to remove it. The fluid will slowly drip out so be sure and have a small bucket to catch it. Brake fluid is VERY CORROSIVE and will destroy driveway sealants. It hardly drips, maybe 1 drop per every 2 seconds.
8. Unpack your new AMG calipers. They should come with new mounting bolts. According to Mercedes, the bolts should not be reused. Remove the blue rubber plug on the new caliper and screw it onto the brake hose shown in Figure 10. This is a bit hard since the caliper is heavy and you have to keep turning it. Tighten it to 18 Nm with the 14mm wrench. Let the caliper hang behind or preferably place it on something to prevent any strain on the hose.
9. Unpack the new brake rotor, see Figure 11 for brake rotor comparison, and place it on the axel. Line up the holes. Place some thread lock fluid on the T30 screw, and tighten to 10 Nm so the brake rotor stays firm (see Figure 12).
10. Place the new brake caliper over the brake rotor. Notice the new setup does not have a separate subframe for the caliper. It is all one unit. Using the new bolts that came with your brake caliper, tighten the brake caliper frame bolts to 115 Nm in place after lining the holes up as shown in Figure 13. The brake caliper will now be very firm over the brake rotor and your project should start taking shape now.
11. Unpack your new disc brake pads. All the pads are the same. There should be 2 for each side. Also, each pad has a shiny metal shim plate. There is anti-squeal paste between the pad itself and the metal shim plate. Make sure you DO NOT get any paste on your hands or on the caliper. If you leave the pads the way they are, you will be fine. Do not remove the shim plate. Gently insert the brake pad in the caliper with the shiny metal side on the outer side of the caliper facing outwards and the black pad touching the disc itself as shown in Figure 14. You will have to wiggle the pad a bit to make it fit.
There are 2 holes on each pad, and 4 holes on the caliper. All these holes have to line up. You will notice there are 2 long metal pins included with each caliper. These are used to hold the pads in place. Also included is 1 pad separator plate, this must be placed over the pads. Start by placing 1 pin in from the behind the caliper. You will first enter the caliper, then the metal shim plate, then the pad, then the pad separator plate, then the pad on the other side, shim plate on the other side, and finally the caliper holes on the other side. The pin will have to be tapped in. Refer to Figure 15 and Figure 16 to see the pin installation. Now, for the other pin. You will have to press the pad separator plate inwards while inserting the second pin. Press it in all the way. You can use pliers to press the pin in if you don't have room to tap it in. This completes the assembly of the the brake system.
12. Tighten the locking bolt for the brake pad sensor, on one side for the car only, to 8 Nm as shown in Figure 17.
13. There are various methods used to bleed the brake system. The two man method, vacuum assisted method, pumping method, etc.. You can do further research on the net.
I used the vacuum assisted method shown in Figure 18. The vacuum fluid evacuator I used is a mityvac unit, www.mityvac.com. Each caliper has a brake fluid bleed screw. The screw is covered with a painted rubber protector as shown in Figure 19. Pop the rubber protector off. Using a 11mm wrench, gently unscrew the bleeder. I next attached the fluid evacuation unit to this bleeder and started suction. The idea is to remove any air inside the caliper and have ONLY fluid in the caliper. MAKE SURE YOU KEEP THE FLUID RESERVOIR (see Figure 20) IN THE ENGINE COMPARTMENT FULL ALL THE TIME WHILE DOING THIS. That means, CHECK THE FLUID RESERVOIR OFTEN during this procedure! Any air sucked into the brake system, can lead to further problems such as brake FAILURE. The resulting bleeding procedure if air enters the system can take all night.
Start suction on the unit and wait until all the air bubbles come out and you see only fluid. Stop suction and tighten the bleeder screw and replace the rubber protector cover. You are done. Repeat all these steps again for the opposite side caliper. Use genuine Mercedes Benz brake fluid.
14. Reattach the wheel and tighten the wheel bolts to 100 ft-lb. Be sure and tighten the bolts in a star pattern as shown in Figure 21. You may need to use chocks under the tires to keep them from rotating while you tighten the wheel bolts.
Click on the photographs to enlarge them.
Figure 1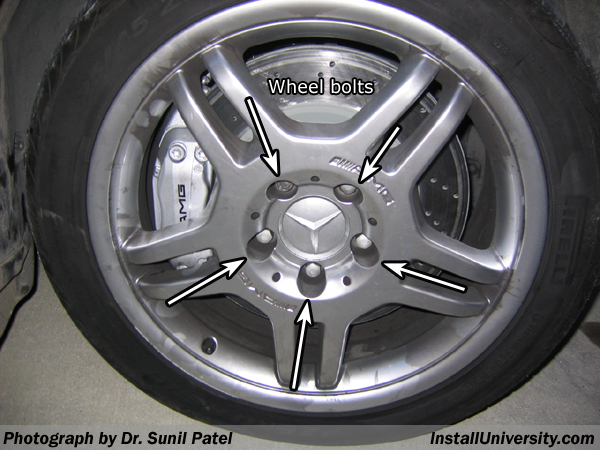
Figure 2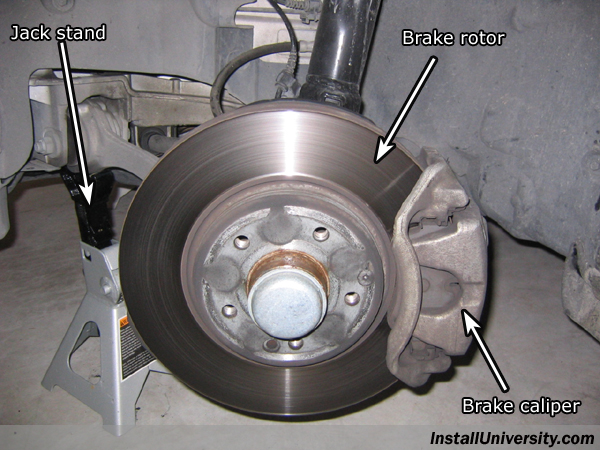
Figure 3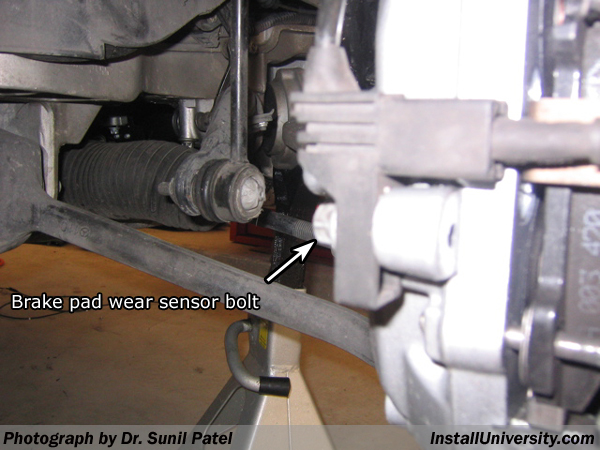
Figure 4
Figure 5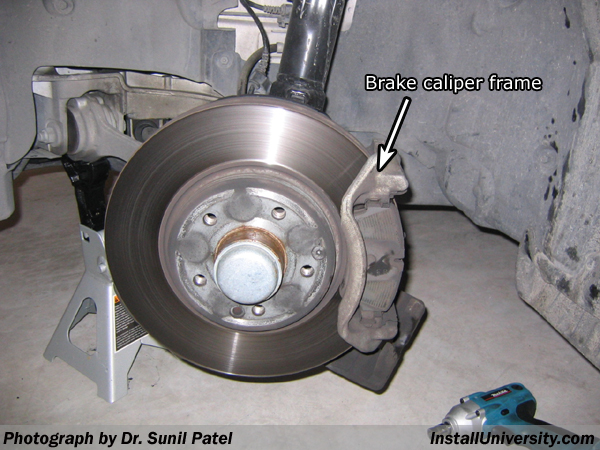
Figure 6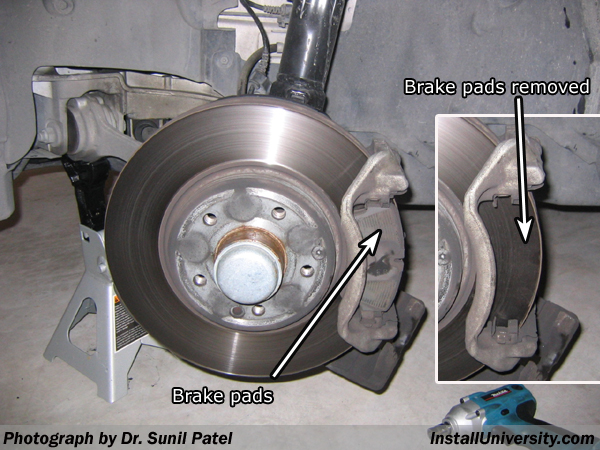
Figure 7
Figure 8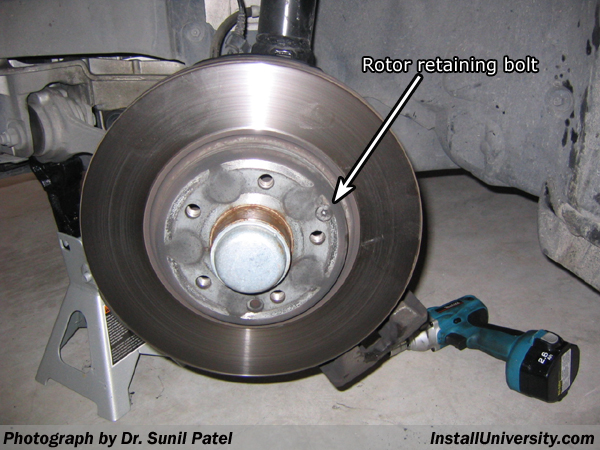
Figure 9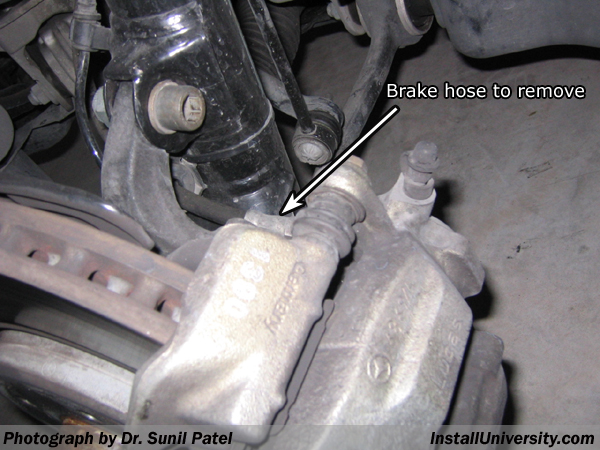
Figure 10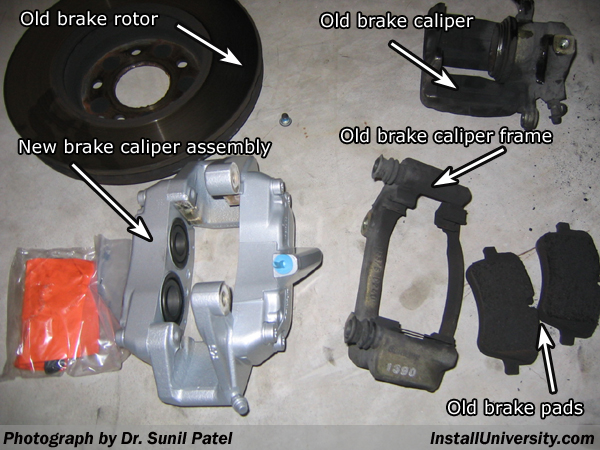
Figure 11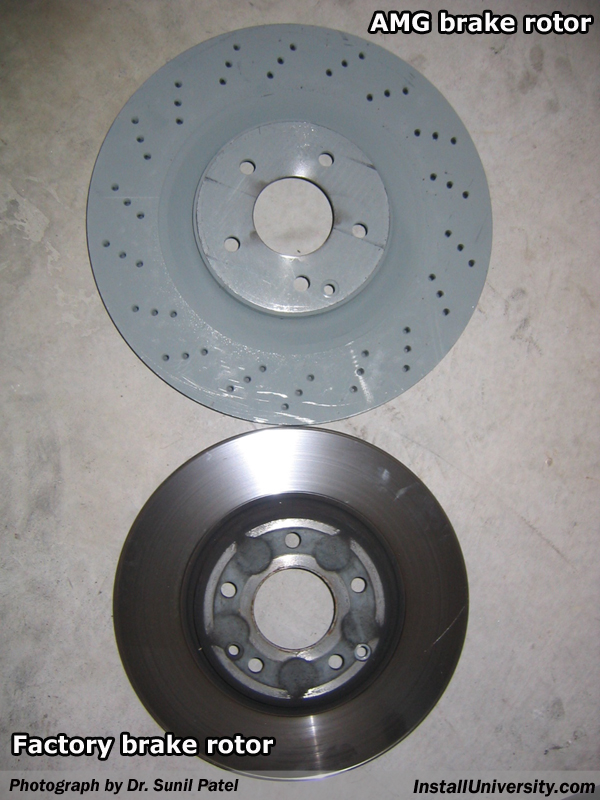
Figure 12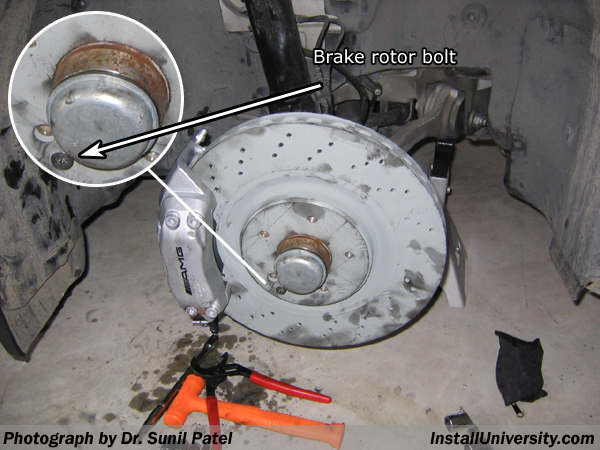
Figure 13
Figure 14
Figure 15
Figure 16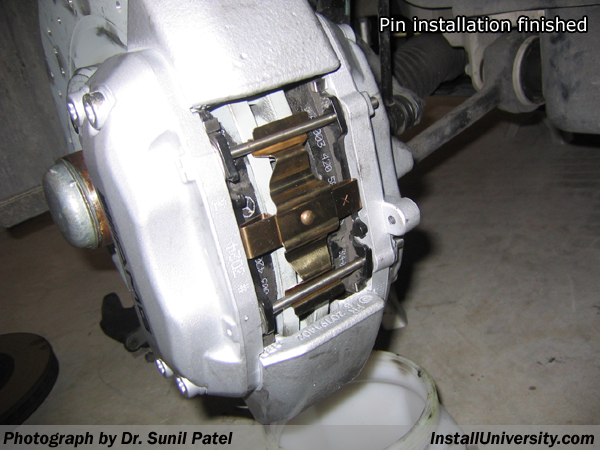
Figure 17
Figure 18
Figure 19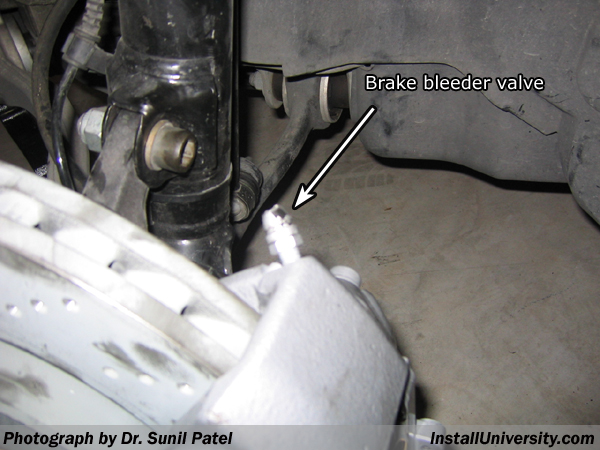
Figure 20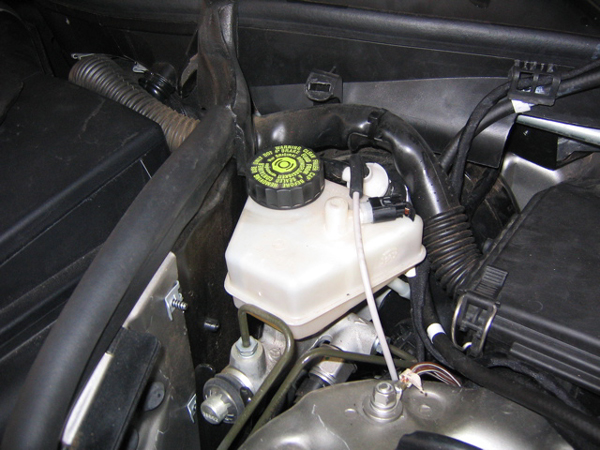
Figure 21