Painting Your Hood Struts
Autotask & N-able Pricing for Profits: a guide for MSPs and IT Service Providers www.autotask.com/n-able
3M Paint Protection Film Attention To Detail of TN 3M Certified Installation Facility www.autosurvivalpro.com
Bug Shields & Deflectors Bug & Stone Protection Dark Tint, Logos, or Chrome www.CARiD.com/Bug-Shields
Hand Painted Hood Struts
| Tools you will need: |
| Latex Enamel paint* |
| Two small sponge brushes |
| Spray Paint |
| Clear Coat |
| 300 grit -2000 grit sandpaper** |
| Masking tape |
| Small Paint Brush*** |
Car: 1999 Z28 Camaro
Installers: Eric and Kelly Barger
Email: help@installuniversity.com
People who helped us from major tech talk to general advice:
Elmer Boggs ( eboggs_jkvl)
Perform all these installs at your own risk. Know how to use all of your shop equipment and take necessary safety precautions when performing ANY modifications and or maintenance items to your vehicle. Seek the advice of a paid professional and do not substitute this publication for the advice of a paid professional. This product is how we accomplished our installs and is not meant to be carved in stone. We are not responsible for a mistake, misprint, or any other error found in this guide. This guide is intended as a supplement and not to be your only source of information.
Purpose: Painting your hood struts is strictly an appearance modification. We wanted to add something different to our engine compartment and the hood struts were just yelling at us to be painted!
Preface: Before you start into this install be sure you know how to use all of your shop equipment. Take your time and be careful.
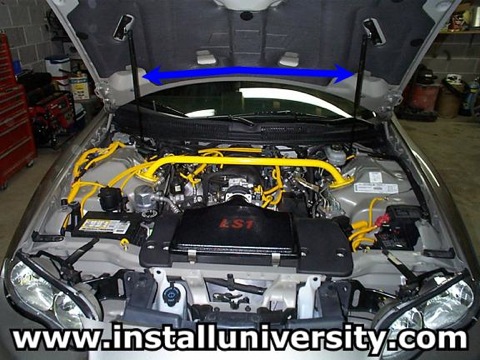
1. Open your hood to take a look at your current hood struts (see blue arrow in Figure 1).
Note: We bought two extra hood struts from our local dealership.
Figure 1
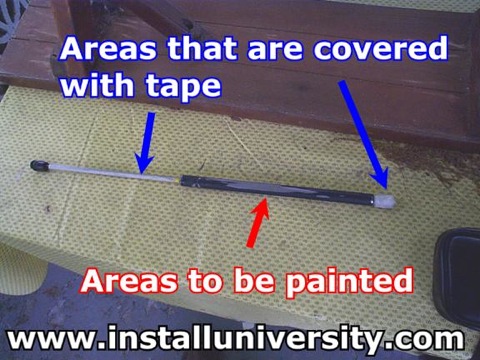
2. Look at what part we are going to be painting (see red arrow in Figure 2). You want to tape up the lower section of the hood strut and the end of the strut that will receive the paint (see blue arrows in Figure 2).
Figure 2
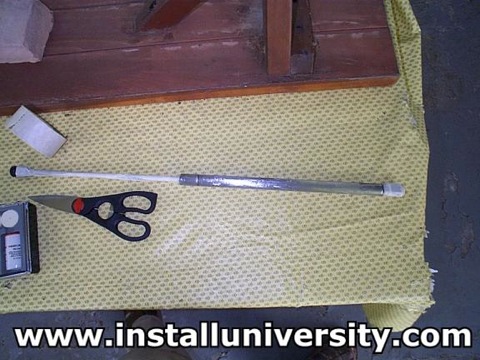
3. Go ahead and grab some sand paper and start roughing up the area to be painted. We went a little over board on the first hood strut and used a dremel tool. This was a total waste of time. Just sand a little on the hood strut enough to rough it up (see Figure 3). When you have finished sanding down the struts clean them with a damp rag and then dry them off.
Figure 3
4. Now you want to mix your paint up good and paint a really thin coat on the strut. Take your time and be sure you use thin coats. Let the strut dry for a few minutes (approximately 30 minutes between coats) and then repeat this process about 4 more times.
5. Let the hood struts dry over night and then place two more coats of paint on them. You should begin to see a dramatic improvement over color. It might look streaky at first but it will soon change to a more solid looking coat. Let the struts sit overnight once again.
6. Now you are ready to spray paint the struts. This step required two people for us. One held the hood struts in the air and slowly turned them while the other sprayed the paint. You want T-H-I-N coats of paint. Let them dry for AT LEAST 15 minutes between applications. If you develop runs in the paint you are spraying to much paint on the struts. Don't worry, you have not messed up. Let the struts dry overnight and sand them down using sand paper with a grit rating of 450 or larger.
7. Once you get the smooth shiny look you are ready to add a clear coat to the paint. We bought some clear coat in a spray can. We simply put one coat on each hood strut. Let the struts dry overnight.
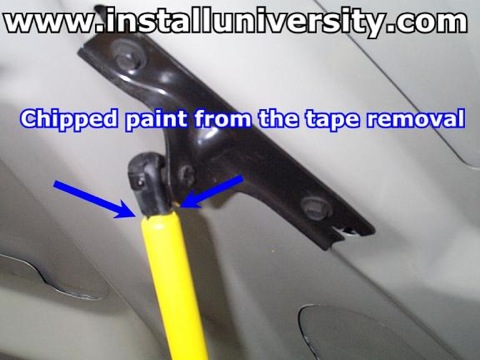
8. Now you will need to remove the tape off from the hood struts. This step is very critical and should be done with the greatest of care. You have some spots chip or tear away (see Figure 4) from the top edge. Don't worry about that because it is not the end of the world. :-) You just need to purchase a model paint brush. The kind you would use to paint a model car or airplane. Take some of the paint you used to paint the hood strut and touch of the edge.
Figure 4
9. Apply your choice of car polish (Zaino) or wax. We applied a Z3/Z5 combo for long lasting protection. See what the hood struts look like in finished view on our car (see Figure 5).
Figure 5

Comments: Take your time and paint many coats of paint on the hood struts before calling it quits. The more the better.
Web Author: Eric Barger help@installuniversity.com Copyright © 1999 - 2002 Eric Barger. All rights reserved. Revised: June 07, 2007.