EGR Pipe Replacement
| Tools & parts you will need: |
| 10 mm socket |
| 15 mm socket |
| 3 inch extension |
| Ratchet |
| Torque Wrench |
| 1998- 1999 EGR pipe 12556643 (comes with o-ring) (2000 model has a different pipe part number) |
| EGR pipe exhaust manifold gasket p/n |
Gasket between AIR pipe and exhaust manifold 12553617
Expect approximately 5 minute – 30 minute install time
Car: 1999 Z28 Camaro, 10,750 miles
Installers: Eric and Kelly Barger
Email: help@installuniversity.com
People who helped us from major tech talk to general advice:
Elmer Boggs ( eboggs_jkvl)All my buds at LS1.com
Perform all these installs at your own risk. Know how to use all of your shop equipment and take necessary safety precautions when performing ANY modifications and or maintenance items to your vehicle. Seek the advice of a paid professional and do not substitute this publication for the advice of a paid professional. This product is how we accomplished our installs and is not meant to be carved in stone. We are not responsible for a mistake, misprint, or any other error found in this guide. This guide is intended as a supplement and not to be your only source of information.
Purpose: There is no special purpose to this mod. If you are performing this you probably bent your EGR pipe where it enters the intake manifold causing a vacuum leak, eventually stretching your o-ring gasket to where you need a new one. This would make your car idle spastically and really rough. Therefore, we want to replace the pipe and o-ring gasket (on the pipe end that bolts down to the intake manifold).
Preface: Please read this paragraph before proceeding. Please pay close attention to step #7. This is a critical step and must be read before you make the same mistake we did!
Before you start into this install be sure you know how to use all of your shop equipment. Take your time and be careful.
1. You need to locate the EGR valve (see blue arrow in Figure 1).
Figure 1
2. Disconnect the electrical connector that plugs into the EGR valve (see blue arrow in Figure 2). Take a good look at how the EGR valve is positioned before you remove it. Remove the two (2) 10 mm bolts that hold down the EGR valve (see red arrow in Figure 2).
Figure 2
3. Now you need to remove the two (2) 10 mm bolts that hold the EGR pipe to the exhaust manifold (see blue arrows in Figure 3). Watch out for that gasket, it is very fragile and might split into pieces if you are not careful. We got a new gasket to replace the old one because we also messed it up when we bent the pipe.
Figure 3
4. Now you need to remove the 10 mm bolt that attaches the EGR pipe to the intake manifold (see red arrow in Figure 4).
Figure 4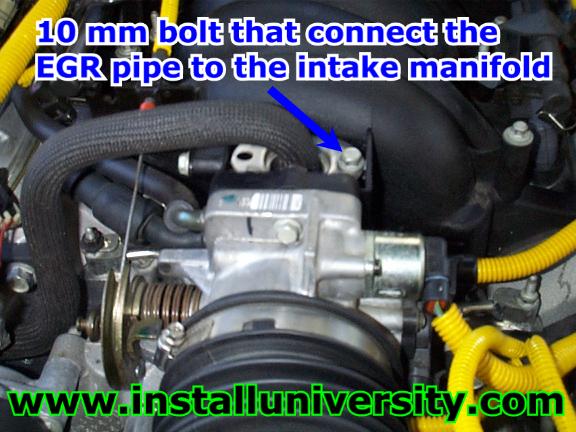
5. Remove the EGR pipe mounting 15 mm bolts from the EGR valve bracket (see blue arrows in Figure 5).
Figure 5
6. Replace your old EGR pipe with your new one. You will have to twist the EGR pipe around to get it out from the wire that runs in front of the EGR valve. Just take your time and you will get it out from under it.
7. You need to tighten the EGR pipe 15 mm mounting bolts to 37 ft-lb (see blue arrows in Figure 6).
Figure 6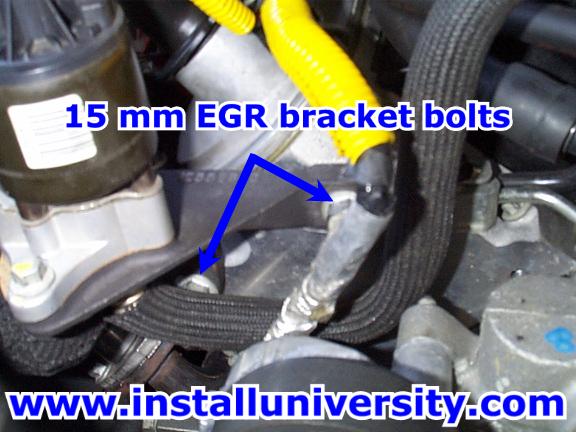
8. Tighten the two (2) 10 mm bolts that hold the EGR pipe to the exhaust manifold to 15 ft-lb (see blue arrows in Figure 7). Don't forget to place the gasket back in there.
Figure 7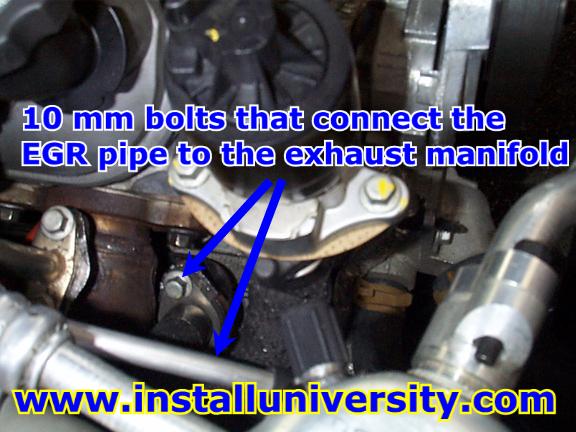
9. This next step is very critical! Please pay close attention! You need to use extreme caution when tightening the EGR pipe back up to the intake manifold. DO NOT tighten the bolt over 89 in-lb or YOU WILL STRIP the brass heli-coil out of the manifold! See Figure 8 for that end result.
Your Helm's manual will say to tighten the bolt shown in Figure 8 to 106 in-lb. That is WRONG!
Figure 8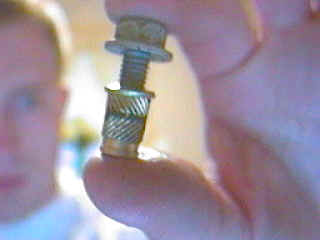
This is not a desirable situation at all! I was lucky and was able to JB Weld the brass heli-coil back into the Intake Manifold. Some people are not that lucky and have to fork out some major money, as much as a $1000 for the intake manifold and installation.
Tighten the 10 mm bolt that attaches the EGR pipe to the intake manifold to 89 in-lb. Please do not exceed that measurement! Use a torque wrench!! You might want to use a 3 inch extension to rise above the EGR pipe if your torque wrench is too fat.
10. Now you need to place the EGR valve back on the bracket and tighten the 10 mm bolts twice (see blue arrows in Figure 9). Yes twice. Tighten them to 89 in-lb the first go around. Then tighten the bolts on up to 18 ft-lb.
Figure 9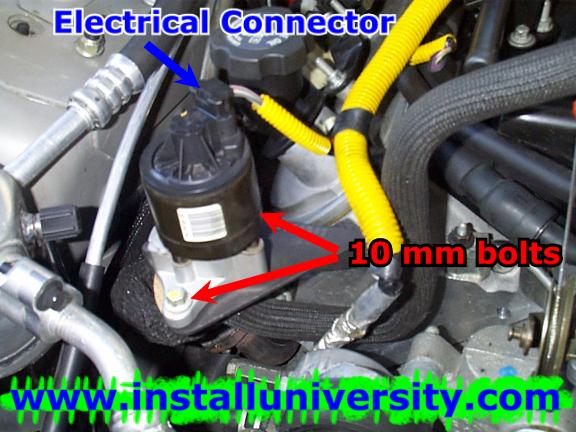
That's it! You are done!!!
Comments: Next time take your time, research your modification extensively, and use a torque wrench. Shoving out $70 stinks when you could have prevented it.
Web Author: Eric Barger help@installuniversity.com
Copyright © 1999 - 2002 Eric Barger. All rights reserved.
Revised: June 07, 2007 .