This page will act as the official project car update page, or our garage diary, in the weeks to come. Our heads/cam budget buster, 1999 Z28, will be on center stage for you to read about and learn what stage one heads retaining the stock valves, mild cam, Mac headers, LS6 intake manifold and a few other modifications will provide on an LS1. We will have a detailed write up and overview at a later date but for now, this will have to do.
Our goal is to slap together the heads/cam package for a low price without sacrificing top quality and to break the 400 rwhp barrier. Not everyone can go around dropping large amounts of cash into their cars and that includes us. Responsibilities are a part of life and having a budget comes with the situation. So sit back and watch my progress that may help you decided on a winning combination that suites both your needs and power requirements.
Page overview:
- Date Diary - Keep track of our day by day activities
- After heads/cam - up to date information
- Before heads/cam - baseline information
- Cost Sheet This will keep a running tab on all parts, supplies, and tools purchased
Date Diary
July 1, 2002
- Received LS1 Edit after four weeks of waiting. I have deleted the A.I.R. and EGR diagnostic trouble codes and adjusted my idle. The thorttle body hole was enlarged a hair to help bring the IAC counts down in the 50 range. I am currently trying to figure out what "tuning" is and what is the best way to go about it.
- Received ASP tensioner pulley from Thunder Racing. This pulley has higher edges on it to keep the belt from walking off. I had already replaced my older tensioner arm with a new one but the new one didn't work with the ASP pulley so I had to go back to the old tensioner arm with the ASP pulley. I am going to try a 6.0 liter tensioner setup on my car because I believe that my tensioner was bad. This would be a cheaper solution for those with my problem and there are a lot of us out there.
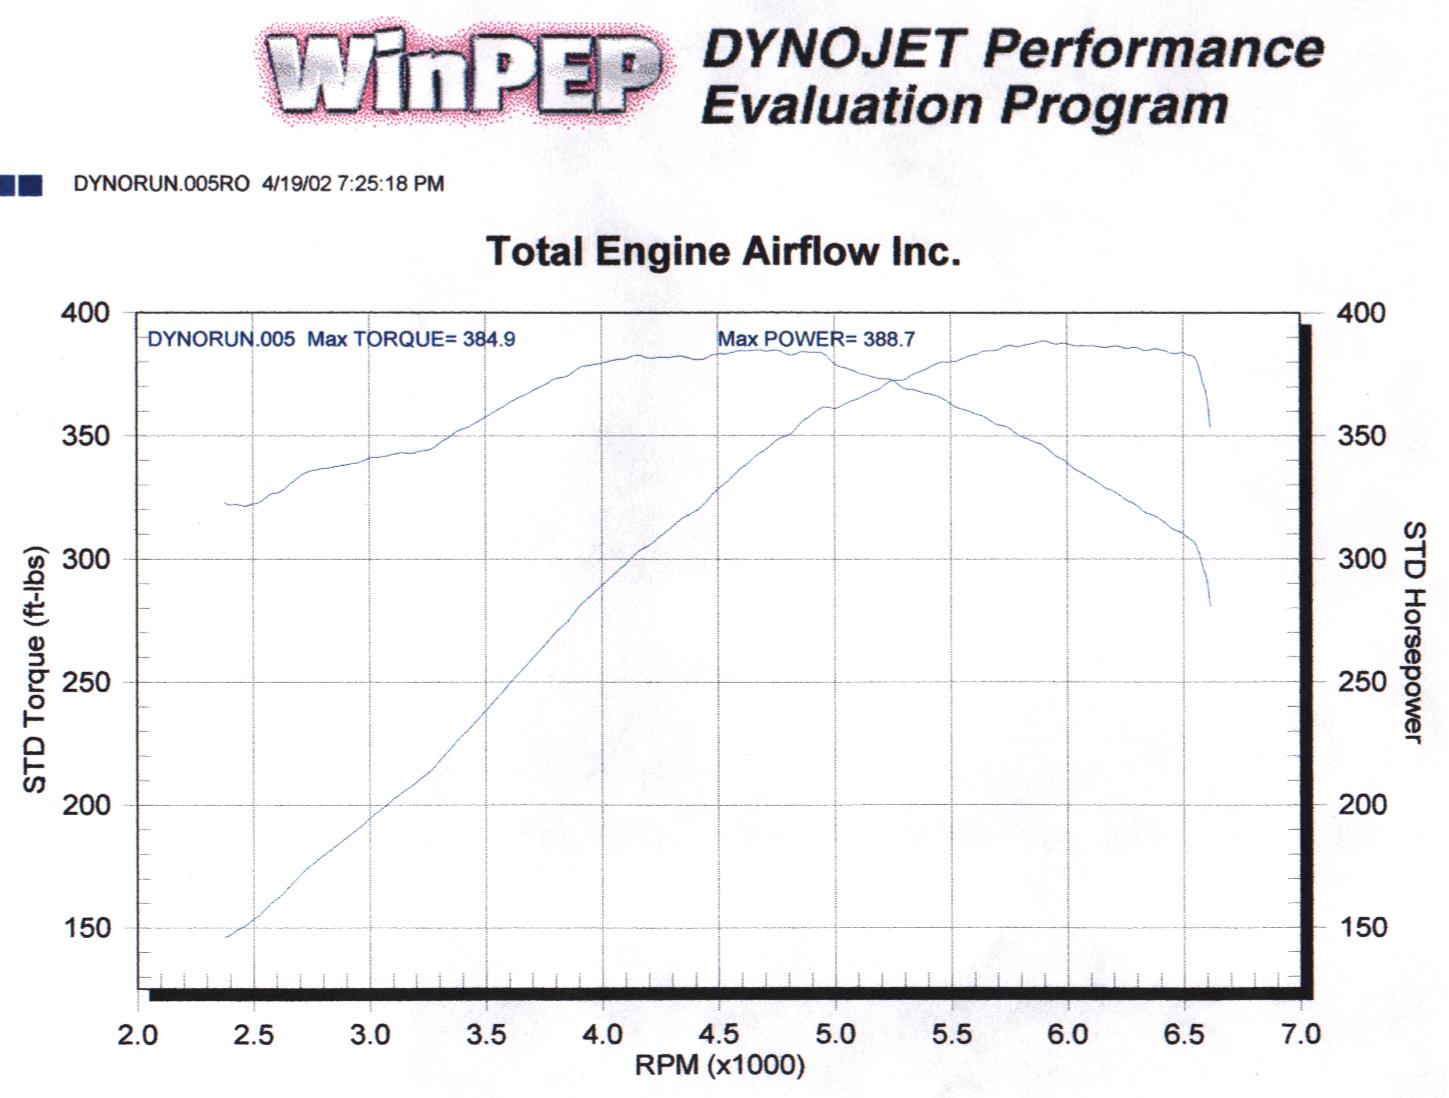
- Dyno'd the car with 800 miles on the heads/cam/header package. I picked up 80 rear wheel horse power! Great googly moogly!! Check out the new "after heads/cam" section I have put up.
- Installed TEA heads/cam package. A big thanks to my friend Darryl for letting me use his living room for sleep, his driveway for the install and his hands for some help! The car runs incredible! I have only encountered one problem since the install and that was finding my drive belt hanging off the idler tensioner and power steering pump by two ribs.
- I will be typing up an install summary of recommendations, advice and some stories from my install to help you. I won't be doing an install document on this swap for several reasons. This is an easy swap to do if you allow yourself enough time and patience. I can say right now I highly recommend 6 point sockets from Snap On or equivalent for the head bolts, rocker arm bolts and the crank pulley bolt. This will be included in my install summary.
- ARE blueprinted oil pump arrived. Whooo! We cut it close! Order yours early!!
- Received my chromemoly pushrods from Thunder Racing. My oil pump is the only major part left that I lack.
- Ordered all 10 M8 bolts from my local dealership. The manual says they don't have to be replaced but I said what the heck, what is an extra $20 at this point for a little piece of mind.
- Ordered a set of comp cams chromemoly pushrods stock length (7.400") from Thunder Racing.
- Received my cam in the mail today from Total Engine Airflow. I lack my install kit (gaskets and such) and I will be set.
- Ordered a blueprinted oil pump from ARE just to make sure I don't have an oil pump that poops out.
- Installed the MAC mid-length headers and off road y-pipe. I noticed a definite seat of the pants improvement in acceleration. I still have no muffler on the car and the loudness increased a lot but I still think it is ok to drive around the way it is. However, in order to protect everyone else's ears around me I think I might have a small high flow muffler with a turn down put on in the back where the stock muffler was present at one time. I would like to thank Phil Watson for lending a helping hand on the install.
- Called Thunder Racing and ordered two O2 simm's for my soon to be deleted catalytic converters.
- Started this diary page so people can follow along on my quest to break 400 rwhp with stage 1 heads with stock valves accommodated by a nice low budget daily driver package
- Picked up heads and dyno'd the car. 310.0 rwhp and 327.7 rwtq
Total Engine Airflow Stage 1 heads with factory valves
63.7 cc combustion chambers on 2001 LS1 Cylinder heads which gives a 10.5:1 staic compression ratio.
Mod’s that matter (performance):
- Hypertech Power Programmer 3
- Fram Air Filter
- Whisper Lid
- LS6 Intake Manifold
- TEA Stage 1 Heads with factory valves
- Andy/Hammer Cam
- Mac Headers with off road y-pipe
- Stock intermediate pipe
- Zed cutout
- Flowmaster 1 chamber muffler
- Stock 3.42 gear
- ARE oil pump
- Fast Toys Ram Air
- Before – 301.9 HP / 319.1 Torque
- After - 381.3 HP / 377.6 Torque
- Before - 310.0 HP / 317.7 Torque
- After - 388.7 HP / 384.9 Torque
I base lined 310/325 in Knoxville with HPP3, whisper lid and K&N air filter. TEA’s dyno had me lower than that by 10 hp/6 TQ after I added the LS6 intake manifold and cutout. I find it hard to believe I took a step backwards. This leads me to believe their dyno is one of those that measures a little on the low side. To see if I am correct, I am going to bust down to Knoxville one day and get a run in on their dyno before I do any other modifications.
Track testing starts this Friday night (April 26, 2002) on street tires. Then the following weeks I will move up in traction (nitto’s after that, etc…).
So far I am very pleased with my results. My midrange torque and horsepower are great in my opinion. Once I get my graphs on line I guess everyone can make their own assumptions. ;) My website will be updated shortly with some more goodies. Scanned dyno graphs and such including an overlay of a MMS stage 2 car dyno’d on their dyno. I requested it so I could compare my setup to other packages out there to make sure I am getting my money’s worth. :)
A few notes about the heads. They are 2001 LS1 heads as stated above and were CNC ported IN HOUSE at Total Engine Airflow. So the results should be very repeatable. They retained the exact factory valves they had in them when I received them from Shaun (valvegod). I have 987 Comp Cam springs and 7.40 chromemoly pushrods. I am also running the ARE oil pump (which I have seen some oil usage with but not sure if the pump is the main reason for this).
Dyno Grpahs:
Click on any of the dyno graphs to enlarge them.
389 rwhp/385 rwtq Standard horse powerThis graph shows my best of four pulls on April 19, 2002 (after heads/cam) through an open cutout. This is the standard graph and is not corrected. As mentioned above, I think the SAE stuff is for the birds but I list both because some people are diehard SAE people.
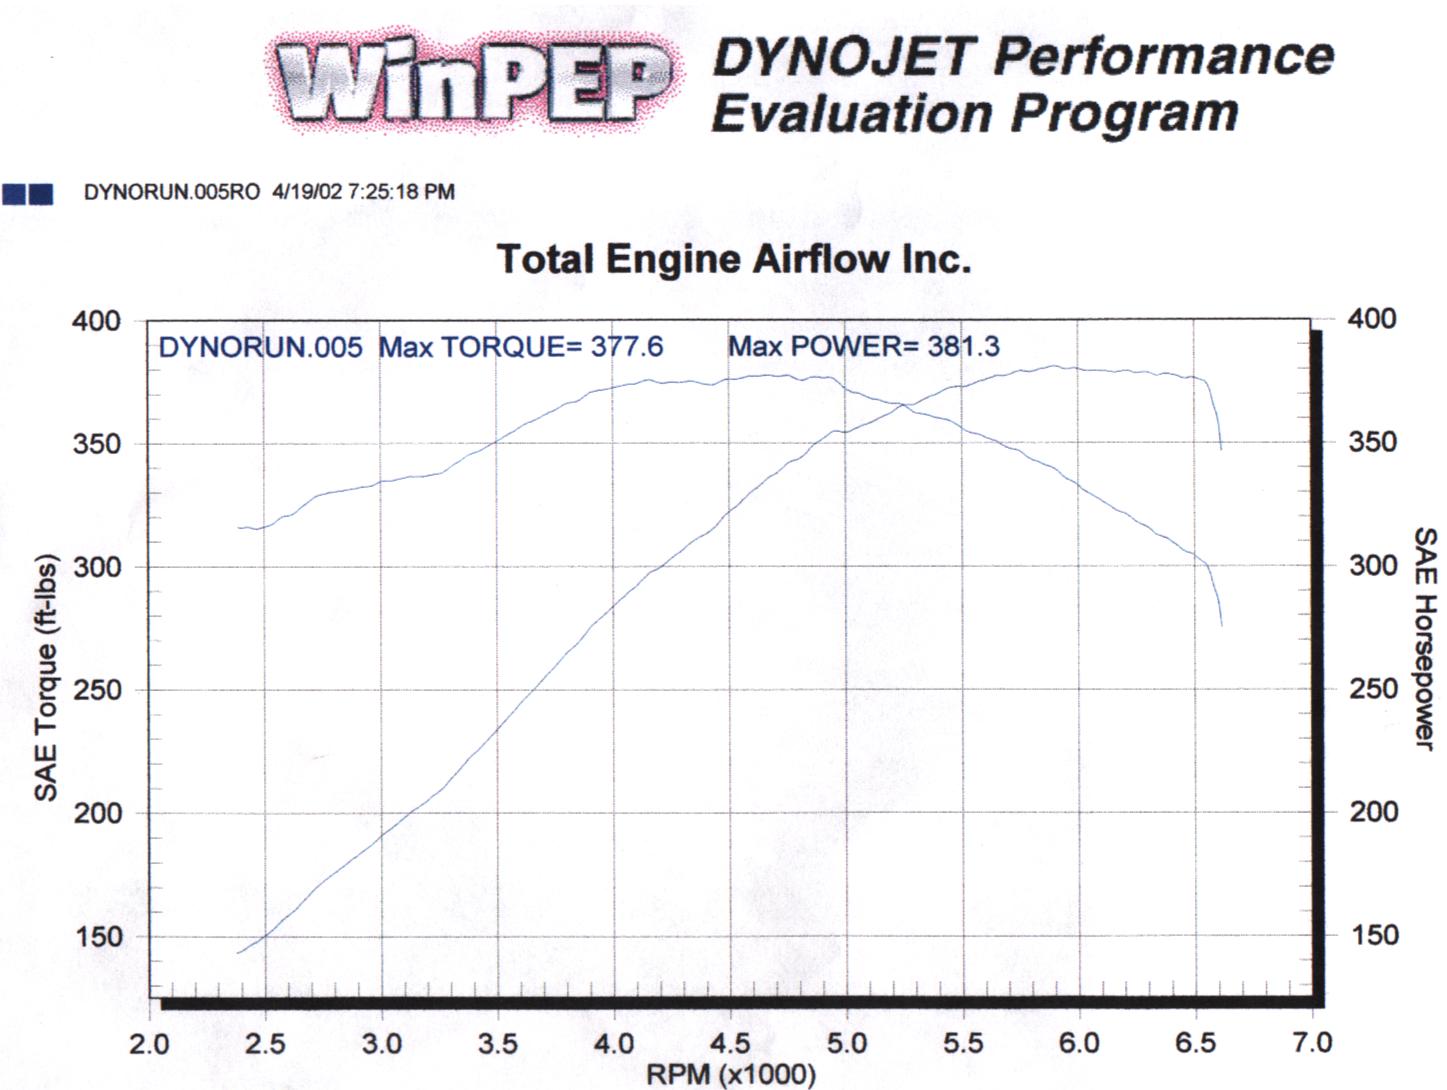
381 rwhp/378 rwtq SAE corrected horse powerThis graph shows my best of four pulls on April 19, 2002 (after heads/cam) through an open cutout. Same exact pull as above but the numbers are corrected.
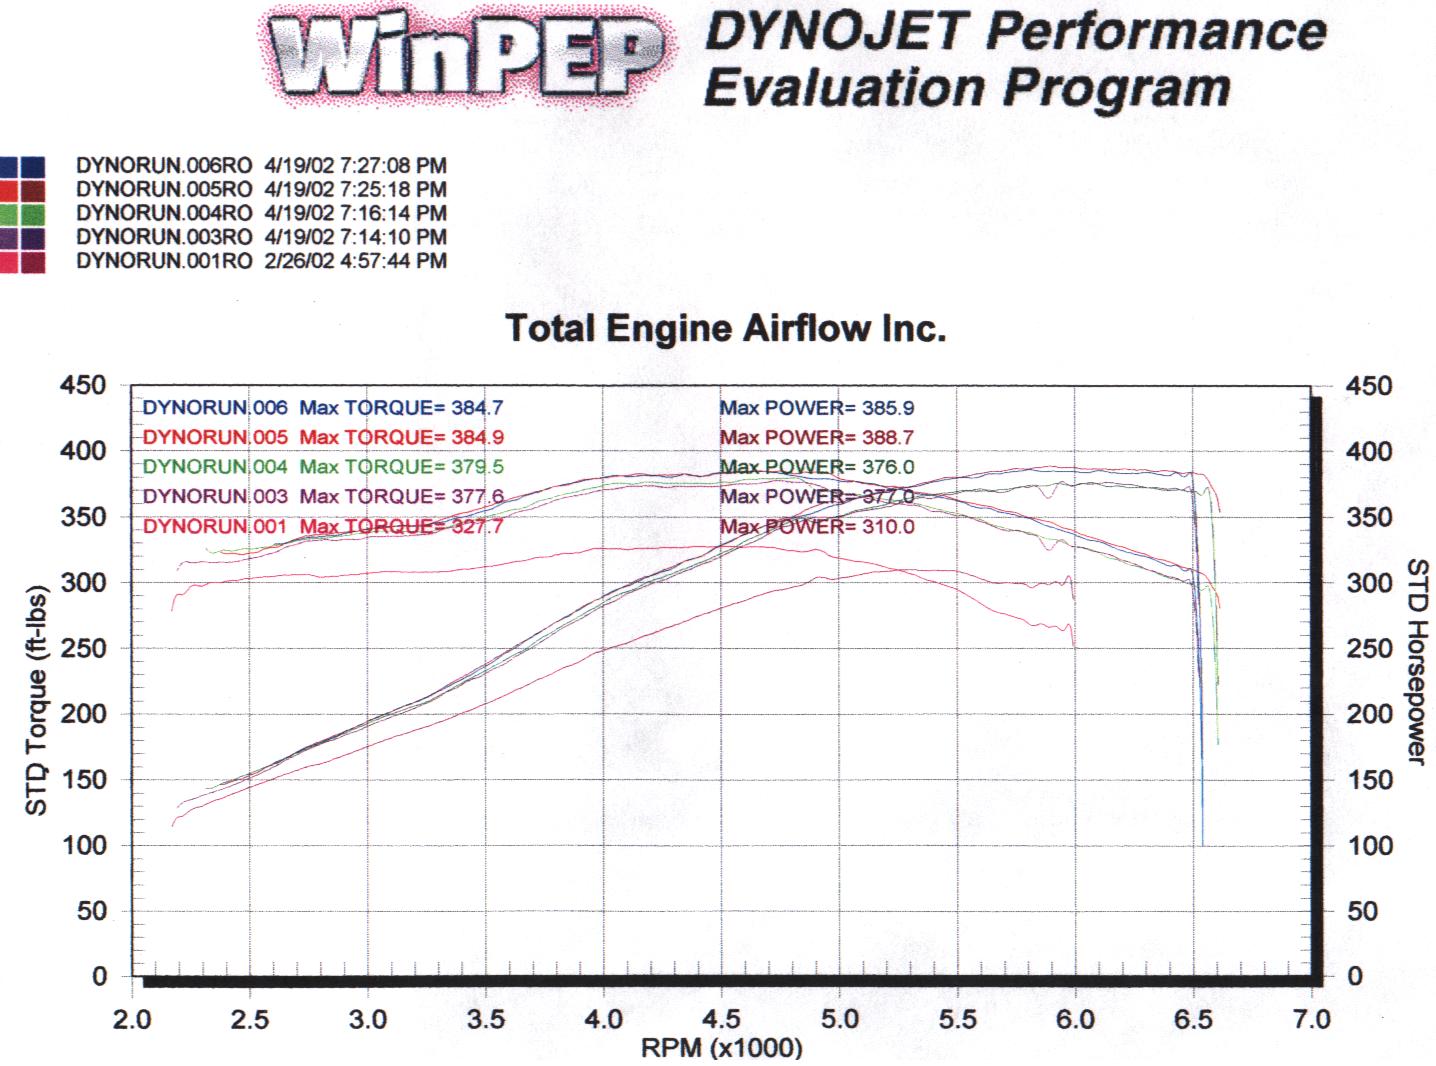
All four pulls from April 19, 2002This graph shows all four pulls on April 19, 2002. Pulls three and four are through the one-chamber flowmaster muffler. Pulls four and five are through an open Zed style cutout. I am guessing that my exhaust is still restrictive since I am using the stock intermediate pipe, where the MAC off road y-pipe meets intermediate pipe necks down quite a bit and the header flanges to off road y-pipe chokes down quite a bit as well. Back pressure testing will be in the near future.
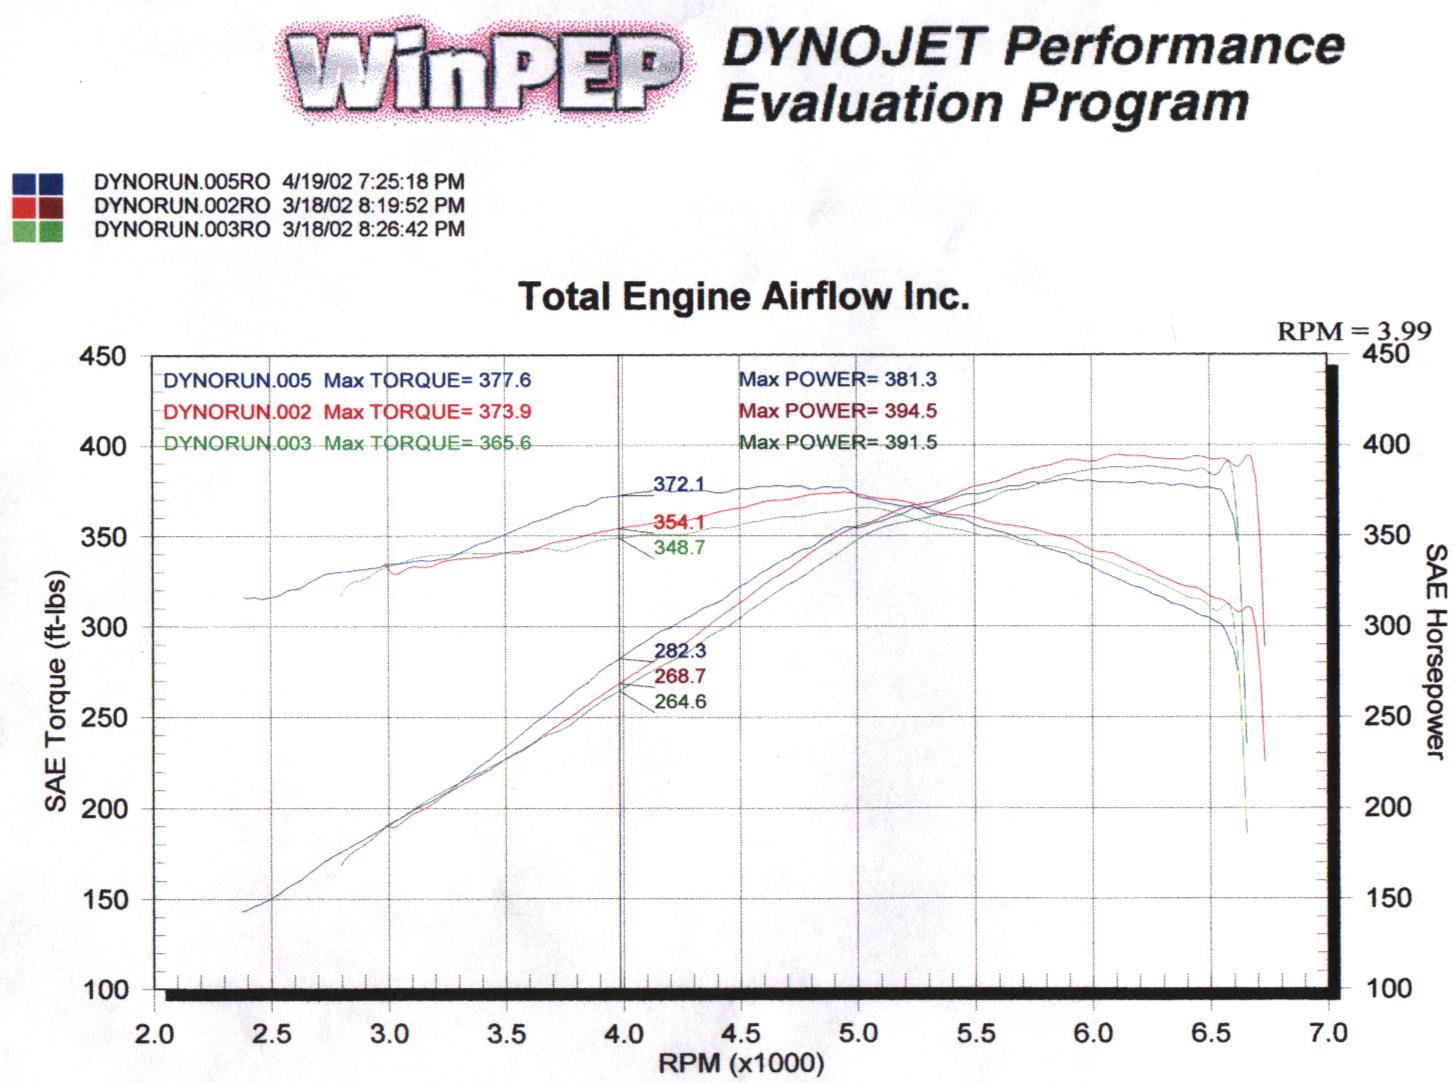
Stage 1 TEA vs. Stage 2 MMS SAE CorrectedThis graph shows my best pull compared against two of the best pulls for a Morgan Motorsports Stage 2 car that was dyno'd one month earlier. The MMS package had longtube headers, computer tuning, stage 2 heads, MMS cam and a few other goodies. Remember, my car has MAC mid-length headers. :-) This graph also shows how conservative the TEA dyno is. Pay close attention between 2000 and 5000 rpms. My car really out shined the MMS car.
Dyno Run 005 = My best runDyno Run's 002 and 003 are MMS Stage 2 package
Stage 2 MMS Heads with 2.02"/157" valves
This heads were purchased around February - March 2002 and were flowed on the same bench as my TEA heads. Once you compare these flow numbers to my heads and view the dyno graphs, it becomes very clear why "peak" numbers are not the tell-tell sign to a good set of heads. There is a lot more to just hogging something out to get good flow numbers. Remember that my heads have the crappy stock valves in them which do not flow as well as an aftermarket valve.
Compare the the MMS Stage 2 heads with bigger aftermarket valves to my Stage 1 TEA heads with stock valves. If this doesn't convince people to shop around a lot more for cylinder head purchases, I don't know what would. You can see that my intake numbers stay witht he MMS heads until 0.400" lift. At that point the stock intake valve can't keep up. However, the stock exhaust valves are not really that bad. I put the hurt on the MMS heads until 0.500" lift. Ouch! My car and my pocket book are both happy that I went with TEA. :-) TEA really are the mid-lift flow experts.
|
|
MMS | TEA | MMS | TEA |
| Valve Lift (in.) | Ported Intake (cfm) | Ported Intake (cfm) | Ported Exhaust (cfm) | Ported Exhaust (cfm) |
| 0.1000 | 65.4 | 67.4 | 55.3 | 53.7 |
| 0.2000 | 142.0 | 142.5 | 111.7 | 111.2 |
| 0.3000 | 210.4 | 210.6 | 153.5 | 167.0 |
| 0.4000 | 261.4 | 249.9 | 196.1 | 206.9 |
| 0.5000 | 283.4 | 259.2 | 238.6 | 232.1 |
| 0.5500 | 278.8 | 265.0 | 247.1 | 240.7 |
| 0.6000 | 275.4 | 265.1 | 260.6 | 248.1 |
Before heads/cam:
Pre
heads/cam form
Our 1999 Z28 (6 speed)
featured the following performance modifications
before heads/cam:
LS6 Intake manifold,
Hypertech Power Programmer 3, !muffler, Whisper air
box lid, Fast Toys Ram Air (doesn't help any on the
dyno), 3.42 stock gears, factory replacement clutch
with McLeod adjustable master cylinder, 160
t-stat.
Dyno'd the car at Total
Engine Air Flow on February 26, 2002: 310
rear wheel horse power and 327.7 rear wheel
torque.
Stage
one heads
Picked up my stage one
heads from Total Engine
Air Flow on February 2,
2002. Below in
Table 1, the flow graph
features the the pre and post intake results along
with the pre and post exhaust results. These
heads retain the stock intake and exhaust
valves. Aftermarket intake valves would
greatly increase the flow but then I couldn't call
my car a budget buster if I had purchased some big
name valves. ![]() On the
exhaust side, the results were far better than
I could imagine on stock exhaust valves.
They flow spectacular and I am very happy with
the results.
On the
exhaust side, the results were far better than
I could imagine on stock exhaust valves.
They flow spectacular and I am very happy with
the results.
The heads were
also milled 0.030" (30 thousandths of an inch)
and were
CNC ported at Total Engine
Airflow in Bowling Green,
KY. This resulted in 63.7 cc combustion
chambers making 10.53:1 static compression.
This is less than most competing aftermarket
heads. This will result in an approximate
10-15 horsepower less for me since I didn't go with
higher compression. That is just fine because
I want to be able to run on pump gas and have no
problems what-so-ever.
Table
1
|
Valve Lift (in.) |
Stock Intake (cfm) | Ported Intake (cfm) | Stock Exhaust (cfm)* | Ported Exhaust (cfm) |
| 0.1000 | 69.8 | 67.4 | 54.7 / 54.32 | 53.7 |
| 0.2000 | 145.9 | 142.5 | 116.6 / 82.16 | 111.2 |
| 0.3000 | 202.5 | 210.6 | 162.0 / 151.68 | 167.0 |
| 0.4000 | 228.1 | 249.9 | 192.7 / 166.96 | 206.9 |
| 0.5000 | 235.3 | 259.2 | 209.9 / 181.25 | 232.1 |
| 0.5500 | 239.4 | 265.0 | 213.0 / 186.03 | 240.7 |
| 0.6000 | 243.5 | 265.1 | 217.0 / 190.43 | 248.1 |
*
There was a
leak (bad connection) on the flow bench when they
were flowed. I tried to adjust the numbers after
the fact because I didn’t notice the mistake until
the heads were already ported. Adjusting down
the flow according to the lower lift flow just
didn't work as you can see. I guess as flow
increases so does the effect the leak has on them
at higher lift flow. This had to cause the unusual
high flow for the stock exhaust port. I know the
ported intake and exhaust were flowed correctly and
the pre intake matches right on with documented
stock intake flow. The right/hand column
numbers were taken from the September 2000 issue of
GM High-Tech Performance, Page
31.
Are
under the curve increase (ported over
stock)
Everyone talks about
increasing the area under the curve so I decided to
figure it out. The stock exhaust area under
the curve was figured using the GMHTP numbers
listed in
Table 1 above. Table 2
list the areas before and after. The area's
were figured up to 0.600" valve lift. If you
have a set of flow numbers on a set of heads and
you would like the area under the curve calculated
and wouldn't mind the numbers being posted on this
website for comparison purposes, please shoot us
an
email.
Table
2
|
|
Intake Area (cfm·in) | Exhaust Area (cfm·in) |
| Stock | 100.3 | 75.2 |
| Ported | 106.3 | 89.5 |
Cost
Sheet
Here are the prices on
all the parts and supplies that I had to purchase
for this heads/cam/header install. These
prices do
not include shipping and
handling or sales tax. Some prices are
incomplete but will be filled in when I get time to
look up the receipts. There are three
sections including parts, supplies and tools.
This way you can have some way of looking at each
section individually.
Parts
Stage 1
Total Engine
Airflow Cylinder Heads -
$1299Mac Mid-Length headers
with off road y-pipe - $499"Andy/Hammer Cam"
(222/222 .566/.566 112 LS) from Total Engine
Airflow - $LS1 Install Kit
(gaskets, head bolts, etc.) -
$200GM exhaust manifold
bolts for header install -
$26.30O2
simulators for deleted catalytic converters -
$98ARE
blue
printed oil pump - $165Chromemoly Pushrods
(7.400" stock length) from Thunder
Racing-
$120GM Factory Timing Chain
- $
Supplies
Package of scrapping
razor blades (box cutters) - $5Brake cleaner (two
cans) - $8Shop vac - Already
owned12 quarts of engine oil
(Valvoline Synthetic) - $4.50 per
quart2 engine oil filters
(Mobil 1) - $10 each