Panhard Bar Installation
Tools
and parts you
will need:
Expect approximately 30 – 60 minute install time |
Date: January 3,
2000 Car: 1999 Z28 Camaro, 8,705 miles Installers: Eric and Kelly Barger Email: help@installuniversity.com People who helped us from major tech talk to general advice:
|
When purchasing, viewing, using, and/or any
other method applied to this publication you agree to the following statements.
You, your next of kin, heirs or assigns release www.installuniversity.com,
all other persons associated in the making, production, participation, and sale
of this publication. Rephrased in plain English: When you purchase
this CD, book, or view this web page you, your next of kin, heirs or assigns
agree not to sue any associated persons with the publication for any accident or
damage in ANY form (mental or physical to your car and/or yourself) because of
this publication or your failure to heed proper safety, maintenance and/or
modification procedures. You also agree that your next of kin, heirs
or assigns cannot sue all persons associated in the making, production,
participation, and sale of this publication.
Purpose: The panhard bar will allow us to have a stiffer rear end so we will increase traction and the predictability of the rear in sharp and hard cornering.
Preface: Before you start into this install be sure you know how to use all of your shop equipment. Take your time and be careful.
1. We placed the rear of the car on two jack stands. We then let the floor jack down to the point where there was a 1/4” space between the differential housing and floor jack. That way if the car decided to fall the floor jack would attempt to catch the car. We also chocked the front tires to avoid the car moving.
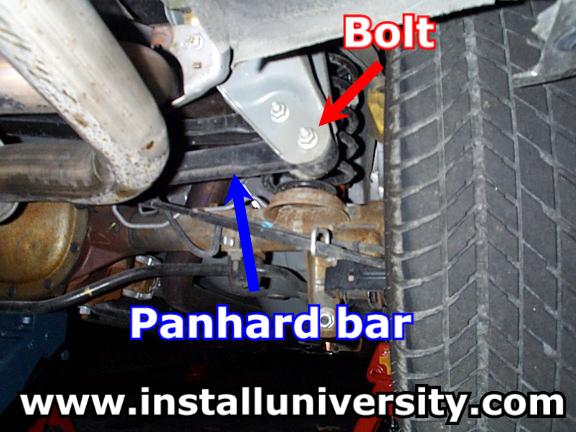
2. We got down underneath the car and located the factory panhard bar. It is a “U” stamped part that runs from one side of the car to the other (see blue arrow in Figure 1).
Figure 1
3. Now that we've located the correct part we looked at how the bolts were positioned on the car. Notice that the bolt head is on different sides at each end. What do I mean by this? The bolt head is on the front side of the car on the passenger side (notice the red arrow in Figure 1) and on the driver side it is on the back side of the car. Don’t really know why it is this way other than because it makes it easier to reach on both sides. Maybe?
You will need to place a 13/16” wrench on the bolt head and an 18 mm wrench/socket on the nut. We used a socket on the 18 mm nut because we used our torque wrench and this made it much easier to break the nut loose. When you remove the bolt, the panhard bar should fall out. If it does not, just gently pull down on it. Repeat the same steps on the other side of the bar.
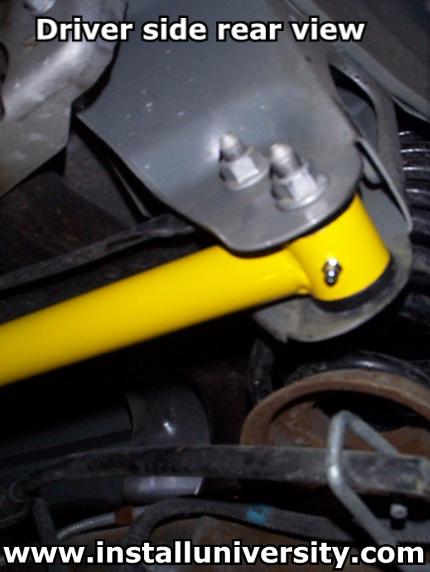
4. I had a non-adjustable panhard bar with polyurethane bushings made for my car by BMR Fabrication. You will need to place some grease with your finger on the sides of the bushings before you try to install the panhard bar. Why? Because, it will be a tight fit. Raise one end of the panhard bar up (be sure the grease fittings are pointed down toward the ground) and push it into position. If you have trouble getting the panhard bar end into the slot, just use a rubber mallet and beat it in. Of course, don’t hit the grease fitting unless you want to break it. In case you do break a grease fitting on a BMR panhard bar, it is a standard 1/4” grease fitting that you can find at any local hardware store. The grease fitting simply threads into place. After you have the end of the panhard bar in place slide the bolt back in and finger tighten the nut. Be sure you have the bolt head on the correct side (refer to Step 3). Do the same to the other side of the panhard bar (see Figure 2).
5. Now that you have the panhard bar back in place, you have two methods to choose from to tighten the bolt. You can lower your car to the ground and tighten it up, but this method could be difficult to tighten using the torque wrench. The second method would be to raise the differential housing with the floor jack until the car raises about 1/4” or so off the jack stands. The rear of the car is in a “loaded” position, just the same as when the car is on the ground, and this gives you more room to use the torque wrench. You will need to tighten the bolt to 61 ft-lb of torque. Yeah, that is really tight but that is what the factory service manual calls for.
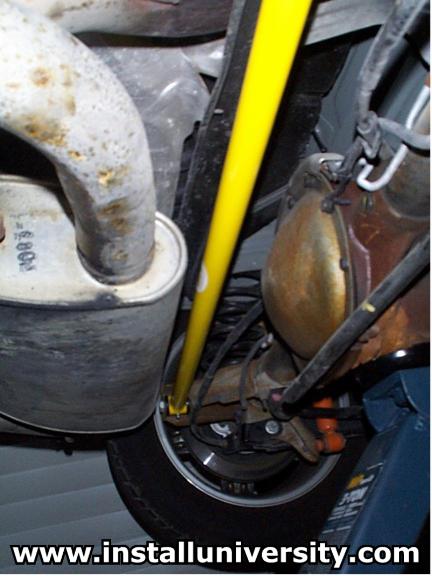
6. Grab a grease gun and grease each end of the panhard bar. Be careful not to put too much grease into the ends (see Figure 3). Two or three pumps of the grease gun should be sufficient. If you start to see the bushings pop out you know you have way too much grease in there. You will need to grab a 5/16” wrench/socket and unscrew the fitting and let the grease work its way back out. I used a marine grade grease recommended to me by Brett Rockey, owner of BMR Fabrications, for its excellent water resistance and stickiness.
Comments: At the time we performed the panhard bar installation, the only other suspension/structural modification we had was a shock tower brace (from BMR Fabrication). The shock tower brace made a huge difference in the car and paved the way for the panhard bar. The car responded really well to the panhard bar and feels much closer to neutral handling than it ever has. Wheel spin has been reduced slightly and hard cornering feels more predictable. Road noise has increased just a little with the occasional squeak being the only noticeable difference. Overall impression leaves me believing that everyone should perform this modification.
| Figure 2 | Figure 3 |
 |
 |
Web Author: Eric Barger help@installuniversity.com
Copyright © 1999 - 2002 Eric Barger. All rights reserved.
Revised:
June 07, 2007.