Torque Arm Bushing Install
Tools
you will need:
Expect approximately 1 hour – 4 hour change time. |
Date:
July, 2000 Car: 1998 LS1 T/A Installers: Z28MECH Email: z28mech@yahoo.com People who helped us from major tech talk to general advice:
|
When purchasing, viewing, using, and/or any
other method applied to this publication you agree to the following statements.
You, your next of kin, heirs or assigns release www.installuniversity.com,
all other persons associated in the making, production, participation, and sale
of this publication. Rephrased in plain English: When you purchase
this CD, book, or view this web page you, your next of kin, heirs or assigns
agree not to sue any associated persons with the publication for any accident or
damage in ANY form (mental or physical to your car and/or yourself) because of
this publication or your failure to heed proper safety, maintenance and/or
modification procedures. You also agree that your next of kin, heirs
or assigns cannot sue all persons associated in the making, production,
participation, and sale of this publication.
Purpose:
Preface: Before you start into this install be sure you know how to use all of your shop equipment. Take your time and be careful.
Many
people have asked if the rear suspension should be loaded or unloaded during the
install. I thought that removing the TQ arm bushing while the rear is loaded
would make the TQ arm shoot straight up into the floor pan. Luckily, this does
not happen! The TQ Arm only goes up about 1-2 inches.
Since
I’ve never crawled under an M6 car, I’m not sure if the bushing for M6 cars
is the same. The install should be the same though.
On
to the install. I bought my Energy Suspension bushing (Part # 3-1111) from
Tom @ http://www.tbyrne.com for $18.99.
I
am happy with this piece, but if you can find a bushing with a grease fitting
I’d recommend that one instead.
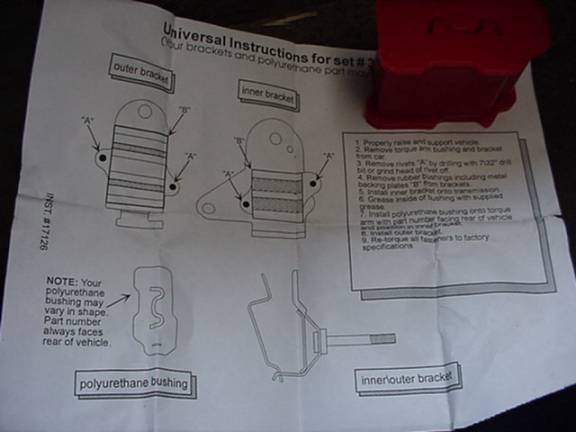
Here
is a quick photo of the instruction sheet.
Figure
1
1.
First, you need to support the car horizontally. I recommend either a drive on
lift or a cozy pit. Craw under till you get to the back of the transmission. You
should have the hammer & chisel in hand cause your going to do a helluva lot
of beating now. I found that a few short sharp hits work a lot better than lots
& lots & lots of softer hits. This is the hardest part of the install.
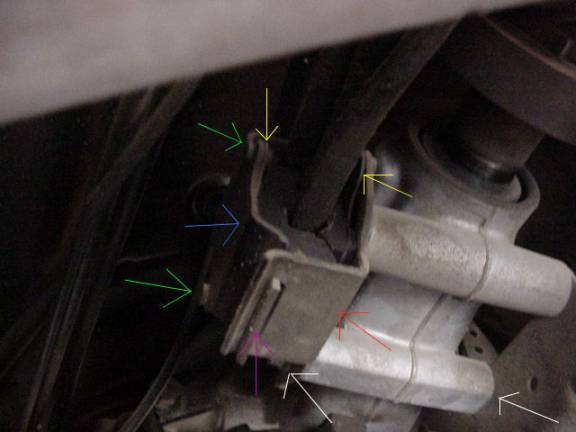
Start
with the 2 on the drivers’ side (Figure 1), then the ones facing the
passenger side (Figure 1). They are marked with Green arrows.
**
If you have a grinder, I suggest removing the bracket from the car &
grinding the rivet heads off (Step 5) **
I decided to remove the heads
with the bracket still in place because I did not have a better place to hold
it. You may have a good sturdy table type C Clamp to hold it in place, but
it’s still awkward.
3.
The stock rubber bushing is actually made of 2 parts. Each part is attached
to a metal backing plate that cannot & need not be removed. They are just
barely visible in Figure 1 (Yellow arrows).
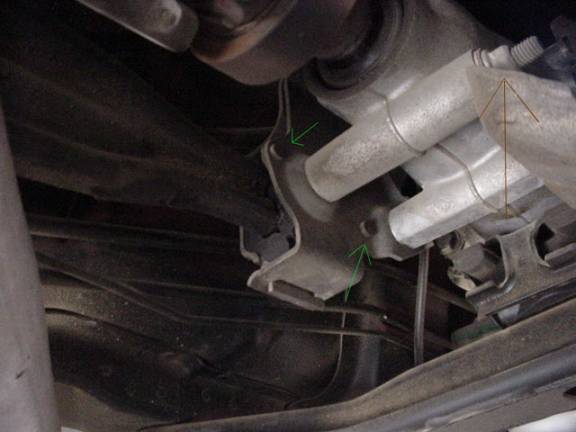
4.
After you have decapitated the 4 rivets, you will need to loosen the bracket
from the tranny. You need to loosen just 1 bolt. The bolt is at the top of the
bracket mounting & I could not get a clear picture of it since it was way to
dark Be prepared to apply a lot of force as the bolt has been torqued down
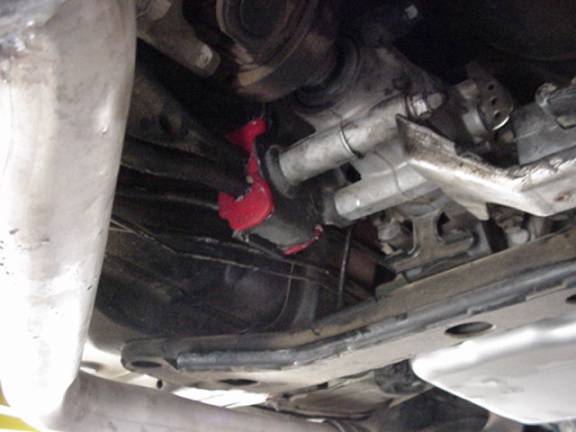
pretty tight. Do not loosen the middle bolt (Brown arrow, Figure 2) or the lower
bolts (White arrows, Figure 1).
At
this point, tension in the TQ Arm will be released & the arm will be free to
move up. No problem here.
Figure
2
5. Now you are
free to work the outer bracket out. Before you do this, reach up & you’ll
find a vent tube running from the top of the tranny to the TQ arm. I’m
guessing this tube is a vent tube anyway. Move the tube out of the way so it
does not fall between the 2 brackets & complicate things.
Notice at the bottom of the
bracket there is a tab (Purple arrow), you need to work the tab out of the inner
bracket (Red arrow).
6. Once removed,
sandwich the chisel between the backing
plate & the outer bushing bracket (Blue arrow). Keep hammering until you
have pried both rivet stems free of the bracket. The rubber bushing should fall
away with it’s backing plate.
7.
Do the same to the smaller part of the bushing that is attached to the inner
bracket. The rubber should fall away with the backing plate attached to it. The
2 pieces look like this. Notice the backing plates. Keys provided for scale.
Figure
4
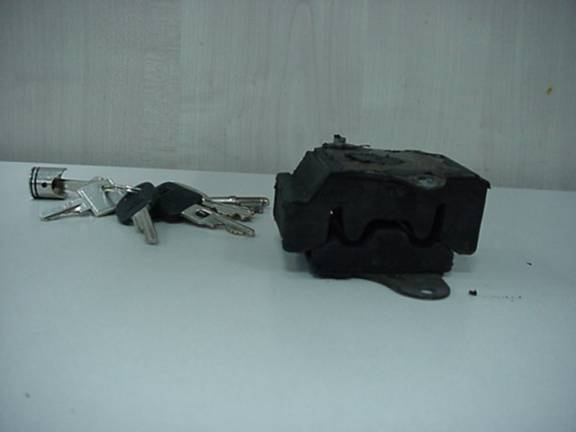
Figure 5

8.
Take your bushing & cram as MUCH grease into it as possible. You will only
feasibly do this once, so get in as much as you can. I’m not a stranger to the
squeaks caused by using
polyurethane bushings so I was very very generous. I filled the inside of the
bushing until grease started coming out the other end ! Before putting the
bushing on the Arm, generously apply more grease to all the surfaces that will
contact metal. When putting the bushing on, find the number on the bushing. When
installed, this number should be facing the back of the car.
I
expected almost all of the grease to come out after pushing the TQ Arm through
it, but surprisingly, less than about a ¼ came out. No matter, grease is cheap J
9.
Get the outer bracket (which you were just cleaning) & fit the tab into the
inner bracket slot.
10.
Now the second hardest part. You need to pull down on the TQ arm & close the
outer bracket over the new bushing. This was a bit difficult, but I used a crow
bar for leverage & got the nut back around the top bolt & tightened to
factory specs.
That’s
it !!
Figure
6
Being
honest, I didn’t feel much SOTP wise, but after looking at the pliable stock
piece, I’m sure the new bushing must be doing something !